DICOM Basics using Java - Understanding Association/ Negotiations
Introduction
This is part of my series of articles on the DICOM standard that I am currently working on (a number of them have already been completed). If you are totally new to DICOM, please have a quick look at my earlier article titled “Introduction to the DICOM Standard” for a quick introduction to the standard. You may also want to look at my other tutorials that have been completed so far to get up to speed on a number of topics including DICOM Encoding, SOPs and IODs. My introductory tutorial covering DICOM Verification will also be very useful to understanding the material that I will cover in this tutorial. This tutorial also assumes that you know the basics of Java or any equivalent object-oriented language such as C# or C++. A basic understanding of networking will also be useful to have but is not mandatory.
Presentation Context, Application Context, Abstract and Transfer Syntaxes in DICOM
DICOM networking looks very cryptic at first. With its unique jargon with words such as Abstract Syntax, Protocol Data Units, Application Context, Presentation Context, etc, any new comer to the standard can be totally put off by it at first. But once you start to understand what they really mean, and with some patience, things really start to make sense and the entire area of DICOM communications begins to look interesting and even fun. I will cover some fundamental terminology that you need to know before you dive into writing software applications that use or provide DICOM services from/to other DICOM-capable software applications. I will use plenty of examples in this tutorial to help you relate to these terms much better. Let us proceed.
If you have read my previous articles in this series, you will remember me describing that the DICOM standard helps devices that could be running on completely different operating systems exchange DICOM objects such as images, waveforms (such as ECG) and diagnostic reports with each other. We also saw that before any actual exchange of data occurs the two devices must agree on the “dialect” of DICOM they speak, or more formally the “transfer syntax” as the standard calls it. This transfer syntax specifies the byte ordering used on that operating system (Big Endian or Little Endian), the type of compression if any being used as well as the type of VR encoding being used (either explicit or implicit). You will also recall the concept of Service Class Users (or SCUs) as well as Service Class Providers (or SCPs), and how the same device can take on different roles when exchanging information with other devices. For instance, device A can play the role of a C-Find SCU when wanting to query for a set of results from other another device B (which will play the C-Find SCP role), but device A can also play a C-Store SCP role when any results that it is interested in is being pushed to it (device B playing the C-Store SCU role in this case).
“The monotony and solitude of a quiet life stimulates the creative mind” ~ Albert Einstein
DICOM refers to the actual network connection between two DICOM devices during which the initial negotiation on the dialect to use as well as the actual transmission of data that occurs after as an Association. During an association, a number of operations can occur. Each of these operations could be in fact be completely independent of one another, and help DICOM applications exchange different types of DICOM objects with one another. When a device (usually the SCU) attempts to open an association with another device (usually the SCP), some validation of the input information is checked before a connection is opened. This includes checks such as to whether the 'Calling AE' is configured at the 'Called AE' already. This is a security feature that is implemented in many DICOM applications to ensure that confidential information is not handed out to “rogue” applications requesting data.
Next, the Called AE also checks to see whether it can handle the type of service (identified by SOP Class UIDs) that is being requested (such as CT Image Store, Query/Retrieval or Print) and can handle this service operation using a transfer syntax that the Calling AE says it can also handle. The Called AE may also do additional checks to ensure that it has adequate capacity to handle this workload as there may be high traffic at the time when the association is being requested and so the association request may be rejected for that reason as well even if all else is good. If the initial validation checks are successful, then successful transmission of actual data corresponding to the SOP class otherwise known as Information Object Definition or IODs as they are called in DICOM) occurs. After all data pertaining to the operations are transferred, the association may terminated by either the initiating party (the SCU) or sometimes by the SCP as well. That’s it. This is the gist of what occurs during an association. But, before we dig deeper into the details I want to cover some jargon specific to the association process. This will help you understand the code examples that will follow.
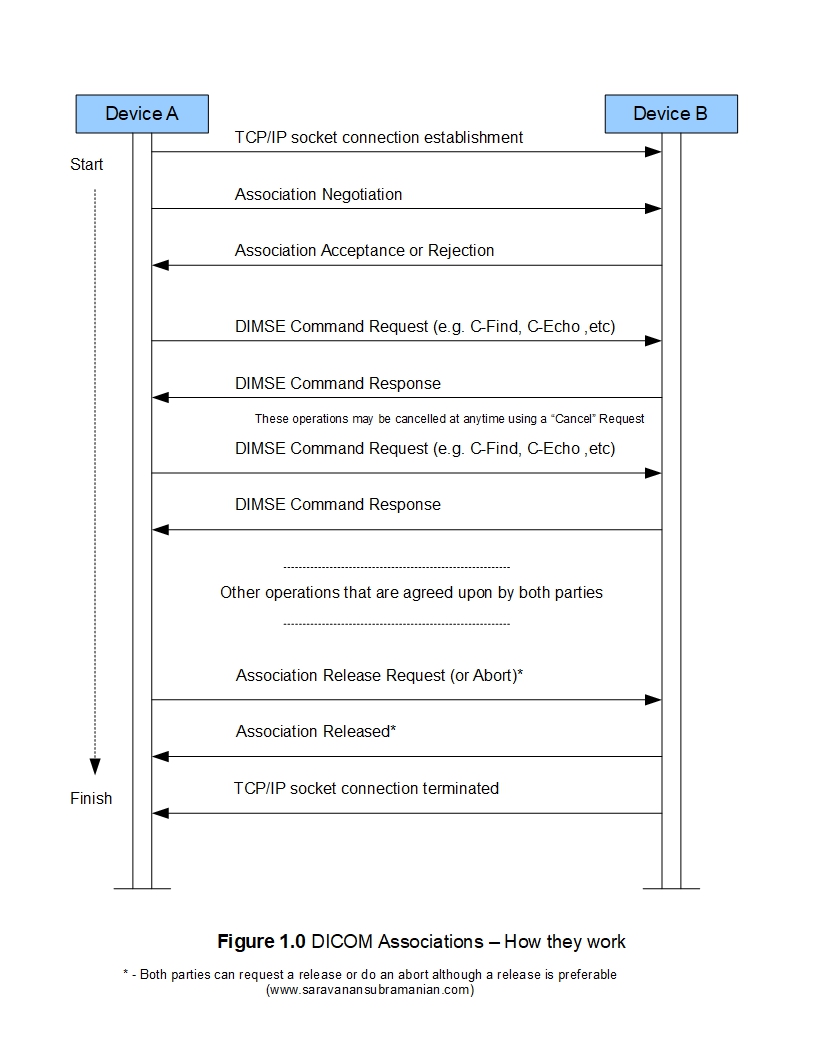
If you see my my illustration above, it should provide a you a good idea of how DICOM association works between two devices at a very high level. The whole process begins by the initiating party (often the SCU aka the Calling AE - here it is Device A) establishing a socket connection to the other party (often the SCP aka the Called AE - here it is Device B). This is done by providing the IP address as well as a port number during the socket connection establishment. Some security checks are done to ensure that the calling party is registered at the Called AE database already, and if not, the connection is not permitted here. If this is good, the socket connection is established.
Association Negotiations in DICOM
Next something called the Association Negotiation occurs during which the Calling AE sends some objects called the Presentation Contexts to the other party. Multiple presentation contexts can be transmitted by the association initiator but the DICOM standard limits the number to a maximum of 128. Each presentation context object itself consists of two objects. One called the Abstract Syntax and the other object called a Transfer Syntax List. The Abstract Syntax specifies the type of SOP class (specified through a SOP UID we saw earlier) as well as the role it is wanting to play - SCU or SCP). The Called AE must support this Abstract Syntax otherwise, it rejects the association request outright. For example, the Calling AE may specify that it wants the C-Find SCP service from the Called AE. If this service is provided, the Called AE then looks at the Transfer Syntax list that was sent to it. This specifies the dialect of DICOM that the Calling AE wishes to speak. For instance, the Calling AE may wish to use the Explicit VR Little-endian indicated through an UID of 1.2.840.10008.1.2.1. The Called AE may not support this transfer syntax, and may look at other transfer syntaxes in the list to see if there is anything in the list that it understands. If none of the transfer syntaxes in the list are supported, the association request is rejected.
I do want to mention here that there should at least one transfer syntax that all DICOM applications must support. This transfer syntax is the Implicit VR Little-endian indicated by an UID of 1.2.840.10008.1.2. This is the only mandatory DICOM transfer syntax that all DICOM applications must support. The problem with this syntax is that as the name specifies the VR encoding is implicit and hence requires the called application to have an up to date DICOM dictionary to make any sense of the incoming data. However, the recommendation is to always use some kind of explicit VR encoding transfer syntax wherever possible as the VR type can be understood from the passed in data itself. Please note that the standard also permits the use of private abstract syntaxes as well as private transfer syntaxes between the parties as well. Please see the official DICOM documentation for more information. At this point of negotiations, the association is either accepted with the Calling AE being notified about presentation contexts which are acceptable in the response message, or the association is rejected by the Called AE. Please also note that there can be more than one presentation context accepted as multiple SOP classes or “Abstract Syntaxes” may supported by the device. Along with this information, the specific transfer syntax that is supported for that presentation context is also indicated.
I should also mention here that there is something called Extended Negotiation during which additional negotiation occurs between the devices to agree on specific semantics for a specific SOP class such as C-FIND, C-GET. etc. This is when information such as the role that the devices want to play (SCU, SCP or both), the maximum number of asynchronous operations that can be invoked/performed by a device, user identity information in the form of username, Kerberos authentication tickets, SAML assertions, JSON web tokens, etc can also be communicated during this process. The user identity information exchanged for example can be used to keep an audit trail, provide access to or restrict the results returned to a specific organizational level that the user belongs to, etc. There is simply so much to cover on this topic, and I will stop at this for now. Not all vendors implement all these capabilities, or may choose to ignore these during association establishment. Associations can still established with some defaults assumed by the service provider in some situations (where a role is not specified for instance), and in other situations, the associations are rejected as well. This aspect of DICOM can definitely cause interoperability issues in some cases so do some testing before you purchase a product. Please see DICOM documentation on the details of this.
Once the basic as well as any extended negotiations are completed, the Calling AE knows what services to expect from the Called AE, and this completes what is called Association Establishment in DICOM networking. At this point, the Calling AE can start sending DICOM commands along with any associated data to the Called AE. The diagram below shows the various DIMSE commands that are passed back and forth during any association negotiation related activity.
In addition to the presentation contexts that are transmitted, other information such as Application Context and User Information objects are also transmitted when attempting to start an association. These objects provide ways to perform fine-grain control over the communications between the devices although most of this is optional or left to their default values in my opinion. The application context information enables us to essentially identify the calling application name and manufacturer information. Many vendors use this to recognize that the calling application is their own and can then switch to a more optimized non-DICOM protocol for further communication. When not specified, most implementation default to the NEMA specified UID (1.2.840.10008.3.1.1.1). You can however request a special UID from this organization as well which is a recommended practice which enables you to uniquely identify the application. User information is not what you think. This essentially enables us to control (if supported by the called application) things such as maximum size of data sent in chunks, the version number of the application, whether the operations to be carried can synchronous or asynchronous in nature, what specific role each device will play (SCU or SCP) as well as the type of queries supported (hierarchical, or extended which means support for relational type queries). I have rarely mucked with these and usually leave them at their default settings and things have still worked fine. However, I encourage you to refer to the DICOM standard for more information.
How do DICOM operations work within an association?
DICOM SOP class (SOP stands for Service Object Pair) is a combination of DICOM Message Service Elements (called DIMSEs) which are essentially commands along with object data defined by Information Object Definitions (IODs). For instance, to perform a CT image store operation, the calling application needs to send both the command (C-STORE) as well as the actual CT image (CT IOD). Both the command and the data objects are represented by well defined structure using the same DICOM element groupings that we saw earlier. Now, what I didn't mention or go into earlier (since that would have totally confused you at that point) is that these DICOM commands fall into two categories namely Composite and Normalized. The gist of the differences between the two is this: composite services are heavily optimized by design for image interchange where only new/unmodifiable objects are exchanged (think permanent here), and no further “updates” of existing data is required as this is generally forbidden by DICOM design. This is because any altered data should generally be considered a brand new instance in the DICOM world. Normalized services on the other-hand were designed for use with data on which update or delete operations can occur (management functions). One such example is the N-SET command which is used to update the status of a modality procedure performed step in a DICOM workflow - we will cover these later). Such operations cannot be performed by composite services which are restricted to search and retrieve-type operations only. Because normalized commands operate on normalized entities of data, several of them have to be sequenced and built together for an entire operation to work as each entity of data will point to another entity of data which then has to retrieved through a separate command. Because of this composite commands are generally thought to perform well because they are “chunkier” and don’t require multiple calls but take up more bandwidth during data transfer as data tends to be repeated in the composite objects such as images when a study is transferred between two devices for instance. Normalized operations are “leaner” but require more coordination between the devices. Anyways, I created a quick illustration (see below) that shows the various categories of DICOM commands for you to get a high level idea of these commands quickly.
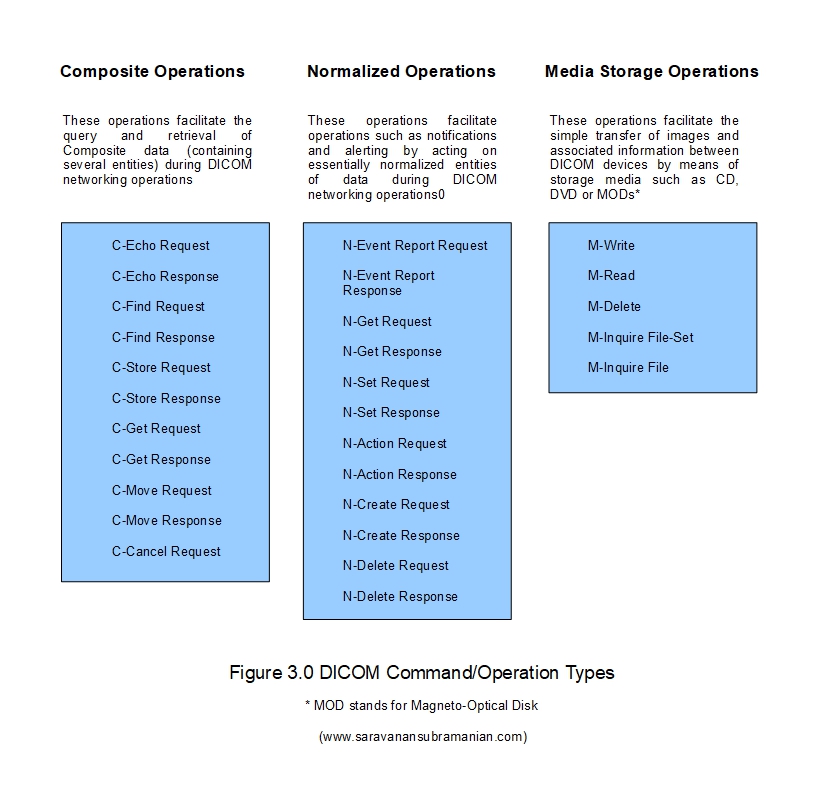
One way to remember the differences is by using this simple rule which should hold true for 95% of the situations which is that composite operations deal with permanent objects such as an image or a structured report that is being archived or retrieved whereas normalized operations deal with update or delete operations and also when you are dealing with data that is temporary or transient such as an image that is sent for printing which is deleted from the print queue after the operation is completed (done using N-Delete). Most of the operations that we have seen so far (such as C-Echo) as well as we will see (C-Find, C-Move, C-Get, C-Store) are composite in nature, but I will also cover normalized operations in my upcoming tutorials that will deal with modality work-list, printing as well as storage commitment services. There is also a third group of DICOM service elements in addition to the composite and normalized types. This is the Storage Media-related operations which help handle both composite and normalized data as serialized files. Examples of commands include M-Read, M-Write, M-Inquire-File,etc. These work a little bit differently as device capabilities cannot be negotiated between the participating actors in real-time and other means (Application Profiles) of negotiating is required. I will cover all these in more detail in my subsequent tutorials in this series.
Digging Deeper into DIMSEs
When an association is attempted, the two DICOM entities transmit a series of DIMSEs (DICOM Message Service Elements) to one another. DIMSEs are to operations what IODs are to data. You need both for successful DICOM networking and data communication to happen. The DIMSE commands consist of the same modular grouping of DICOM elements like DICOM IODs specifying information such as an unique id for the message, the type of command or operation, a command priority (very rarely used), the DICOM AE requesting this operation, as well as indicator specifying whether there is data accompanying this command. If the data flag is set to true on the command, then one and only one IOD data object is transmitted immediately following the command. The Called AE or SCP then responds to this command (and any data that accompanied it) with a response message indicating the results of the operation.
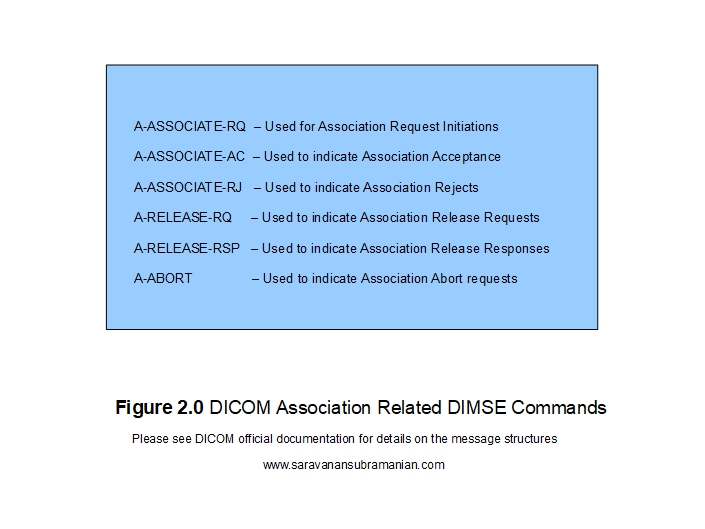
The 'A-ASSOCIATE-RQ' is the DIMSE command transmitted by the requesting party to the remote peer when initiating the association. The receiving party can review the presentation context and accept the it by replying back with a 'A-ASSOCIATE-AC' message, or it can reject the association using the 'A-ASSOCIATE-RJ' message. If/when association is successfully established, the two DICOM entities transmit other DIMSEs to each other based on the operation involved. For instance, when a CT scanner decides to transmit a series of images to the PACS storage server, it establishes an association first, and then send a 'C-STORE-RQ' DIMSE command followed by a CT image IOD instance that needs to be stored. The C-Store SCP responds back with a success or a failure response (using a 'C-STORE-RSP' object) indicating the result of the operation. The C-Store SCU may continue to transmit a series of more commands for every image that it requires to be store, and the process continues back and forth between the two devices along the same pattern. Once the operations have been completed, it is considered a good practice to "release" the association so that it frees up computing resources and network connections that can continue to be used otherwise. This can be done by sending the 'A-RELEASE-RQ' message. Associations can also be "aborted" at any time by either party at any point during the overall process (using a 'A-ABORT' message), and the peer devices must be able to handle such scenarios gracefully.
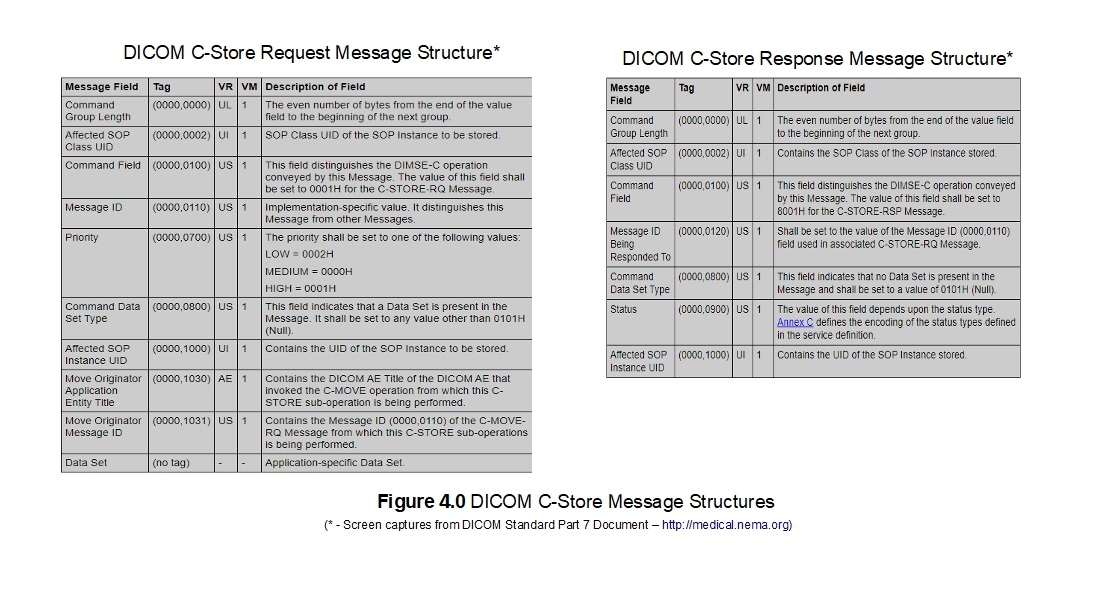
I have included an illustration above showing the C-Store request and response message structures to help you make sense of everything I have described regarding DIMSEs. The tables shown in the illustration above are screen captures from the DICOM standard Part 7 document that covers message exchange fundamentals. Enough talk. Let us look at some code to make sense of everything I have covered so far.
The PixelMed Java DICOM Toolkit - Quick Overview
For the purposes of illustrating many aspects of DICOM that I plan to cover in this tutorial series, I will be using a freely available and powerful DICOM toolkit called PixelMed Java DICOM Toolkit. This is a completely stand-alone DICOM toolkit that provides functionality for DICOM file and directory processing, image viewing as well as DICOM networking-related operations. This toolkit is completely free for both commercial or non-profit use. It is well documented and also has a small discussion forum and mailing list for users. The list of features contained within this toolkit is quite comprehensive. Please keep in mind that the use of this toolkit in my tutorial does not in anyway imply my official endorsement of it for implementing a production application. Every situation is unique, and only you are ultimately in the best position to decide that. This article is also not meant to be a tutorial on this toolkit, and my focus here is simply to tie DICOM theory to what a practical (although simple) implementation might look like. So, if your goal is to learn how to use the PixelMed library, I would encourage you to visit its website or check out the discussion forum or StackOverflow discussion pages for any assistance.
Before We Get Started…
Much like my previous programming examples, I will use the most bare minimum code and approach to help illustrate the concepts that I cover in this tutorial. This means that the code I write here is best suited to simply show the concept that I am trying to explain and is not necessarily the most efficient code to deploy in real life and in your production application.
To get started, you will need to configure a few things on your machine including a Java development environment as well as the PixelMed toolkit before you can run the example if you want to try this out yourself.
- Download and install the Eclipse Java IDE from here (or use any other IDE you prefer)
- Download the PixelMed toolkit library from here
- Ensure that the PixelMed.jar library is included in your Java project’s class path (some examples may require additional runtime dependencies such as JAI Image IO Tools that can be found on PixelMed software download. Look for a tar compressed file called pixelmedjavadicom_dependencyrelease.YYYYMMDD.tar.bz2 or something similar)
- You can find the source code and images used in this tutorial on GitHub
- You can download more DICOM images from this site if you want as well
PACS Server Requirement
In addition to the tools described above, you will also need a DICOM server to execute some of the operations described in this tutorial. If you don't have access to one, you have one of two options. First option is to use Dr. Dave Harvey's free online PACS server provided here. Dr. Dave Harvey is a radiologist by background who runs MedicalConnections, a software company which provides medical imaging-related technology consulting services for clients as well toolkits for developers in the DICOM space. Although I have never used his toolkit, I have reached out to him for help on DICOM matters in the past, and he was kind enough to point me to some very useful material to read or look at regarding DICOM. So, check out his toolkit if you are looking for a commercial solution for your DICOM requirement that is compatible with the Microsoft platform. Another option is to download one of the many open source PACS servers available on the Internet. Orthanc Server is one such tool. Please see my article on getting started with Orthanc Server for more information.
Association Negotiation Example using PixelMed
I will illustrate two short examples here. One for a successful association negotiation and another scenario where the association is rejected.
Successful Association Establishment Scenario
As you can see from my small code example below, I first create a presentation context with one abstract syntax (Verification SOP class) along with a list of transfer syntaxes that I am okay to handle on my side. I then form an association with the remote AE and pass in the presentation contexts at this time. Even though I pass only one in this example, but there is nothing stopping you from asking you for a lengthy list of presentation contexts each one involving a completely different SOP class or abstract syntax along with any associated transfer syntaxes.I then attempt an association with the remote peer (MedicalConnections DICOM server) and check the response that comes back to see if the abstract syntax as well as the transfer syntaxes are supported. The remote peer responded that it does support the abstract syntax and the transfer syntax requested with it.
    package com.saravanansubramanian.dicom.pixelmedtutorial;

    import java.util.LinkedList;
    import com.pixelmed.dicom.SOPClass;
    import com.pixelmed.dicom.TransferSyntax;
    import com.pixelmed.network.Association;
    import com.pixelmed.network.AssociationFactory;
    import com.pixelmed.network.PresentationContext;

    public class AssociationsInDicomDemo {

        public static void main(String[] args) {

            try {
                LinkedList<PresentationContext> prestnContexts = new LinkedList<PresentationContext>();
                LinkedList<String> transferSyntaxList = new LinkedList<String>();
                transferSyntaxList.add(TransferSyntax.Default);
                transferSyntaxList.add(TransferSyntax.ExplicitVRBigEndian);

                byte prentnContextIdOfVerfSopClass = 1;//use any number here for tracking
                String verificationSopClass = SOPClass.Verification; //this is the UID for the Verification SOP class

                //Print it to console so you can see its UID
                System.out.println("The UID of the SOP class that we are using as Abstract Syntax is " + verificationSopClass);

                //Make a list of presentation contexts consisting of the Abstract syntax and the list of transfer syntaxes
                //We will ask the Called AE to see whether it supports these
                prestnContexts.add(new PresentationContext(prentnContextIdOfVerfSopClass, verificationSopClass,transferSyntaxList));

                System.out.println("Attempting association establishment with remote peer...");

                //Attempt to create the association to Medical Connections public DICOM server
                Association association = AssociationFactory.createNewAssociation("www.dicomserver.co.uk", //their hostname or IP address
                                                                                    11112, //the port their entity is listening on
                                                                                    "MedConnServer", //their Application Entity Title
                                                                                    "OurJavaClient", //our Application Entity Title
                                                                                    prestnContexts,
                                                                                    null,
                                                                                    false,
                                                                                    2);

                //print the details of the association established to the console
                System.out.println(association);

                //Check to see if the presentation context is supported by the Called AE
                byte supportedContextId = association.getSuitablePresentationContextID(verificationSopClass);
                System.out.println("The Verification SOP class is supported");
                //Check to see what transfer syntax is preferred by the Called AE
                String transferSyntaxSupported = association.getTransferSyntaxForPresentationContextID(supportedContextId);
                //You should see Explicit VR Big-endian UID - 1.2.840.10008.1.2.2 returned here.
                //This is because an Explicit VR transfer syntax is always be preferable over Implicit (or the "Default") transfer syntax
                System.out.println("The transfer syntax supported for this presentation context is " + transferSyntaxSupported);

            } catch (Exception e) {
                //In real-life, do something about this exception
                e.printStackTrace();
            }
        }

    }
Output shown in program console when running the code sample above is shown below. You can see from the response that an association is first established between the two DICOM devices followed by the response from the remote host that it does supports the DICOM Verification service (it acts as the "Verification SCP" here) and the specific transfer syntax that it wishes to communicate with. Most DICOM applications should support explicit VR transfer syntaxes as they don’t require the application to keep a huge DICOM dictionary handy. If you recall my earlier tutorials, explicit VR encoding involves including the VR type along with the group and tag number to make it easy for the receiving application to parse the data faster
Attempting association establishment with remote peer...
The UID of the SOP class that we are using as Abstract Syntax is 1.2.840.10008.1.1
Association[0]: Hostname: www.dicomserver.co.uk
Association[0]: Port: 11112
Association[0]: Called AE Title:  MedConnServer
Association[0]: Calling AE Title: OurJavaClient
[Presentation Context ID: 0x1 (result 0x0 - acceptance)
	Abstract Syntax:
		1.2.840.10008.1.1
	Transfer Syntax(es):
		1.2.840.10008.1.2
]
The Verification SOP class is supported
The transfer syntax supported for this presentation context is 1.2.840.10008.1.2
“Come forth into the light of things, let nature be your teacher” ~ William Wordsworth
Failed Association Establishment Scenario
As you can see from my small code example above, each presentation context that I would like to enquire about consists of one abstract syntax (or SOP class) along with a list of transfer syntaxes that I am okay to handle on my side. I then form an association with the remote AE and pass in the presentation contexts at this time. I pass only one (Verification SOP) in this example, but there is nothing stopping you from asking you for a lengthy list of presentation contexts each one involving a completely different SOP class or abstract syntax here. I then ask the remote AE whether it supports a particular presentation context id (this is why we need to keep track of ids we passed in). If so, then I also check what type of transfer syntax it prefers to use when handling that particular abstract syntax or SOP class. Most DICOM applications should support explicit VR transfer syntaxes as they don’t require the application to keep a huge DICOM dictionary handy. If you recall my earlier tutorials, explicit VR encoding involves including the VR type along with the group and tag number to make it easy for the receiving application to parse the data faster.
In the code illustration below, I have tried to simulate a condition which causes a association rejection by passing a invalid presentation context.
    package com.saravanansubramanian.dicom.pixelmedtutorial;

    import java.util.LinkedList;
    import com.pixelmed.dicom.SOPClass;
    import com.pixelmed.dicom.TransferSyntax;
    import com.pixelmed.network.Association;
    import com.pixelmed.network.AssociationFactory;
    import com.pixelmed.network.PresentationContext;

    public class AssociationsInDicomRejectionDemo {

        public static void main(String[] args) {

            try {
                LinkedList<PresentationContext> prestnContexts = new LinkedList<PresentationContext>();
                LinkedList<String> transferSyntaxList = new LinkedList<String>();
                transferSyntaxList.add(TransferSyntax.JPEG2000Lossless);

                byte prentnContextIdOfVerfSopClass = 1;//use any number here for tracking
                String verificationSopClass = SOPClass.Verification; //this is the UID for the Verification SOP class

                //Print it to console so you can see its UID
                System.out.println("The UID of the SOP class that we are using as Abstract Syntax is " + verificationSopClass);

                //Make a list of presentation contexts consisting of the Abstract syntax and the list of transfer syntaxes
                //We will ask the Called AE to see whether it supports these
                prestnContexts.add(new PresentationContext(prentnContextIdOfVerfSopClass, verificationSopClass,transferSyntaxList));

                //Attempt to create the association to David Clunie's public DICOM server
                Association association = AssociationFactory.createNewAssociation("www.dicomserver.co.uk", //their hostname or IP address
                                                                                    11112, //the port their entity is listening on
                                                                                    "MedConnServer", //their Application Entity Title
                                                                                    "OurJavaClient", //our Application Entity Title
                                                                                    prestnContexts,
                                                                                    null,
                                                                                    false,
                                                                                    2);

                //Pass an unsupported/meaningless transfer syntax for this SOP class and see what happens. This should throw an DICOM network exception
                try {
                    byte supportedContextId = association.getSuitablePresentationContextID(verificationSopClass,TransferSyntax.JPEG2000Lossless);
                } catch (Exception e) {
                    System.out.println(e);
                    System.out.println("The transfer syntax JPEG2000Lossless UID of " + TransferSyntax.JPEG2000Lossless + " is not supported");
                }

            } catch (Exception e) {
                //In real-life, do something about this exception
                e.printStackTrace();
            }
        }

    }
Output shown in program console when running the code sample above is shown below. The association is rejected by the remote DICOM peer because it does not understand what we are asking it to do.
The UID of the SOP class that we are using as Abstract Syntax is 1.2.840.10008.1.1
Attempting association establishment with remote peer...
com.pixelmed.network.DicomNetworkException: No presentation context for Abstract Syntax 1.2.840.10008.1.1 and Transfer Syntax 1.2.840.10008.1.2.4.90
The transfer syntax JPEG2000Lossless UID of 1.2.840.10008.1.2.4.90 is not supported
Conclusion
This concludes my short introductory tutorial on DICOM association establishment/negotiation. This is an extremely important aspect of DICOM networking and I have tried to convey the very essence of this complex aspect of DICOM communications hopefully in a way that made sense to you in this short tutorial. I will be covering the DIMSEs themselves through separate tutorials of their own in this series. If you have any questions or comments regarding this tutorial, please feel free to send me an email. Please note that I may not get back to you right away due to work and other commitments. In the next tutorial in this series, I will begin our exploration of query/retrieve-related operations in DICOM. See you then.