DICOM Basics using Java - Understanding DICOM Verifications
Introduction
This is part of my series of articles on the DICOM standard. If you are totally new to DICOM, please have a quick look at my earlier article titled “Introduction to the DICOM Standard” for a quick introduction to the standard. You may also want to look at my other tutorials that have been completed so far to get up to speed on a number of topics including DICOM Encoding, SOPs and IODs. This should aid in the understanding of the material in this tutorial as they show you how DICOM information is transmitted. This tutorial also assumes that you know the basics of Java or any equivalent object-oriented language such as C# or C++.
This will be our first venture into the area of DICOM networking which enables the workflows to occur in a medical setting. I will discuss an extremely important but also very useful feature of DICOM networking covering only the minimal amount of jargon we need to understand to verify DICOM connectivity between devices in this tutorial. I will be digging deeper into what occurs at a lower level in my next tutorial where I cover DICOM Association (or handshaking) in more detail. Let us proceed.
Things that many of us take for granted such as ordering a scan procedure when you walk into a clinic, archiving the images taken at the modality such as CT or MR, retrieving and reviewing these scanned images later, diagnosis reporting and printing of desired images on film could not happen without modern DICOM-based networking services between devices even when they are made by various manufacturers within a hospital network. If you are even somewhat familiar with computer networking, you should recognize a popular term called “Ping”. This is an utility that is implemented one way or the other by most operating systems to enable computer network-related troubleshooting. By using this utility, one can test the reachability or availability of a particular host or a network and also measure the total round trip time for test messages that are transmitted to the destination. Although this enables us to test whether a specific host is available or not, it does not tell us whether the device is DICOM-capable or its DICOM features are turned on for instance. This is where the DICOM Verification Service comes in. But before we go any further, we have to understand some technical jargon that will be necessary to understand this topic better.
“The two most powerful warriors are patience and time” ~ Leo Tolstoy
Inside any DICOM network, there may be number of applications running on various devices that consume as well as provide services to/from one another (recall my explanation of Service Class Users and Service Class Providers from my earlier tutorial “DICOM Basics - Making Sense of the DICOM File”). For instance, there may a scan unit such as CT, MR or ultrasound, a PACS server that provides storage and retrieval of scanned images when required, and there may also be a number of DICOM printers that help print images of interest to a radiologist on to film. All these devices may be requesting services to or providing services to one another. Some of these devices can in fact be running multiple software applications as well. For example, on the same machine, two different DICOM software may be installed: one may be a viewing workstation software that provides features such as viewing a well as query and retrieval of images from a remote archive. On the same machine, they may be another software which is perhaps responsible for the printing of DICOM images. Both these applications can be listening for communication with other devices on the network by communicating on completely different ports (note, one application entity can use two different ports as well - one to transmit and other to receive). Each of these unique applications (whether they are running on separate devices or not) are known in the DICOM jargon as “Application Entity” or an “AE” for short. When any two of these entities communicate with one another within a DICOM network, the entity that is the consumer of a service being requested is referred to as the Service Class User or SCU. The provider of the service is known as the Service Class Provider or SCP. DICOM stipulates that each of these entities be uniquely identified by giving them an unique name called “Application Entity Title” (often abbreviated to “AET”). The titles are often coded with numbers and with uppercase characters only (more on this later).
A real life scenario may be necessary to set the context for explaining the DICOM verification service. Suppose, you only spoke English and someone who is perhaps lost came to you on the street and said “Hola señor” in Spanish, you wouldn’t understand anything the person said and they might simply smile and walk away. However, if the person said “Hello” to you, you might reply with a “Hello, How are you?”, and now both of you are in a better position to continue the conversation. The person then may proceed to ask “Do you know how to get to the MET Museum using the bus system?”. If you knew the directions, and you may then reply that you don’t know the answer in which case he may reply back with “No problem.Thanks” and walk away, or you may reply back with directions saying “Please take the M1, M2, M3, or M4 bus along Madison Avenue up to 83rd Street” and the person may then thank you and depart. What happens here is that you both first established a common medium of communication, and once that was established you proceeded to ask each other some services. DICOM works pretty much like that as well.
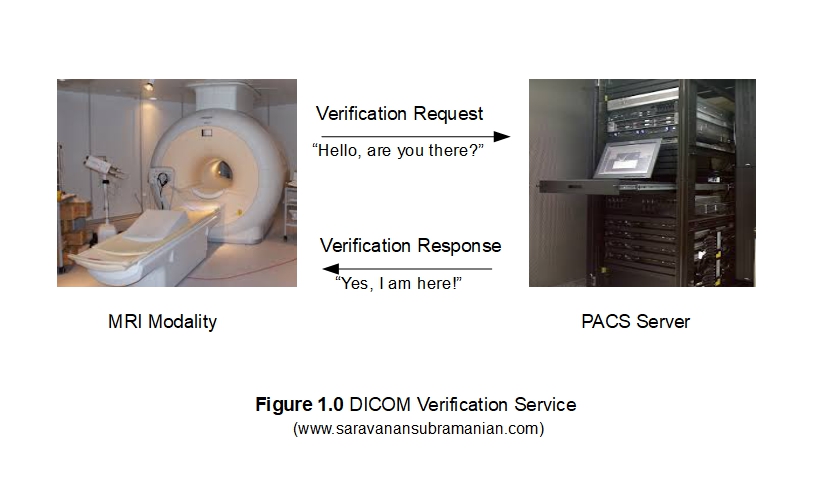
When troubleshooting an existing connection or configuring a new connection between two devices, the technologist or technician uses a preliminary check between the two entities to ensure that they can speak to one another in the same language of DICOM. This check is achieved by a DICOM service called Verification Service (also known as C-Echo or called informally as DICOM Ping). This check is necessary as mere verification of network availability or physical connection between the two devices alone not enough, and they must both “speak” basic DICOM to be able to respond to understand what is being asked before they can reply with a “Yes” or “No”. Further communication between the two entities can only occur after this initial validation is established. DICOM implements this initial validation through the DICOM Verification Service which is identified by its own unique SOP UID (1.2.840.10008.1.1) like many other operations in DICOM which we will be covering in future tutorials. For those who are curious, you can see a comprehensive list here.
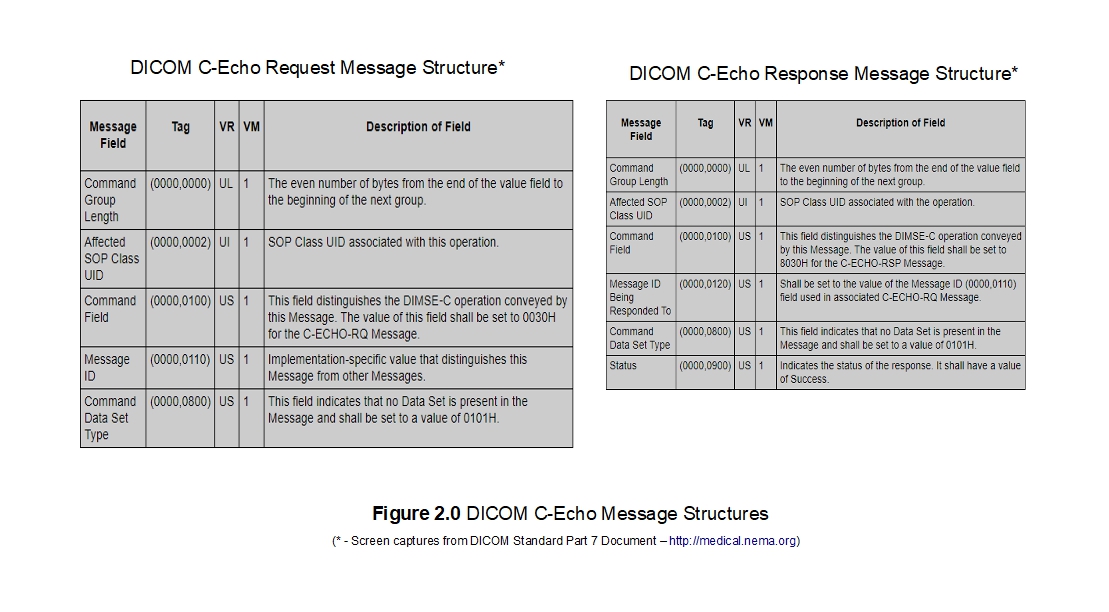
During this verification operation, command objects called DIMSE (which we will cover in depth in my next tutorial) are exchanged between the two devices. These DIMSEs (stands for “DICOM Message Service Element”) are encoded in the same/familiar pattern of DICOM elements that we have already seen when dealing with DICOM files and are in the form a request and response objects. These commands may or may not carry a payload depending on the operation being carried out. In the case of a CT image store operation, a DIMSE command (C-STORE-RQ) is transmitted followed by the CT image (in the form of an IOD) for example. The remote party may then respond back with DIMSE command (C-STORE-RSP) which will provide a status of the operation.However, for the verification operation, there is no other data but the command itself (a 'C-ECHO-RQ' in this case) that is transmitted and the remote party may reply back with a 'C-ECHO-RSP' object. Please see my tutorial on DICOM Associations where I cover these details in more depth.
Something you must also know is that unlike other communication protocols that you might be used to already, and although DICOM standard does not mandate this, information regarding both sides must often be configured at each entity when setting up DICOM connectivity. So, if you are setting up a new DICOM printer in your network for instance, you must not only configure this entity with its unique Application Entity Title within the network, but you must also configure the list of the other entities that might potentially request services from it as well as on this device in order for it respond to them when communicated with. Let us proceed to look at a code example to see how this works in real life.
The PixelMed Java DICOM Toolkit - Quick Overview
For the purposes of illustrating many aspects of DICOM that I plan to cover in this tutorial series, I will be using a freely available and powerful DICOM toolkit called PixelMed Java DICOM Toolkit. This is a completely stand-alone DICOM toolkit that provides functionality for DICOM file and directory processing, image viewing as well as DICOM networking-related operations. This toolkit is completely free for both commercial or non-profit use. It is well documented and also has a small discussion forum and mailing list for users. The list of features contained within this toolkit is quite comprehensive. Please keep in mind that the use of this toolkit in my tutorial does not in anyway imply my official endorsement of it for implementing a production application. Every situation is unique, and only you are ultimately in the best position to decide that. This article is also not meant to be a tutorial on this toolkit, and my focus here is simply to tie DICOM theory to what a practical (although simple) implementation might look like. So, if your goal is to learn how to use the PixelMed library, I would encourage you to visit its website or check out the discussion forum or StackOverflow discussion pages for any assistance.
Before We Get Started…
Much like my previous programming examples, I will use the most bare minimum code and approach to help illustrate the concepts that I cover in this tutorial. This means that the code I write here is best suited to simply show the concept that I am trying to explain and is not necessarily the most efficient code to deploy in real life and in your production application.
To get started, you will need to configure a few things on your machine including a Java development environment as well as the PixelMed toolkit before you can run the example if you want to try this out yourself.
- Download and install the Eclipse Java IDE from here (or use any other IDE you prefer)
- Download the PixelMed toolkit library from here
- Ensure that the PixelMed.jar library is included in your Java project’s class path (some examples may require additional runtime dependencies such as JAI Image IO Tools that can be found on PixelMed software download. Look for a tar compressed file called pixelmedjavadicom_dependencyrelease.YYYYMMDD.tar.bz2 or something similar)
- You can find the source code used in this tutorial on GitHub
- You can download more DICOM images from this site if you want as well
- You must set up a DICOM remote peer (a "Verification SCP") to try out this example. I provide some information below but I will leave you to read the product documentation yourself to configure this yourself as they are pretty straight forward in most DICOM software.
If you are running a Mac like me, you can download software such as OsiriX (available for purchase here). On the other hand, if you are running a Windows OS, something such as ClearCanvas Open Source Community Edition should do (available for download here). if you don’t want to install any applications at all, there are also some public servers available. David Clunie set up something on the Amazon cloud. The IP address of the DICOM entity is 184.73.255.26, the port is 11112 and the AET is AWSPIXELMEDPUB. Although I have tried communicating with this entity, and it responded to my verification request successfully, I am not 100% sure about its up time or availability during the day. I gleaned details of this entity based on a discussion on the web here. So, please contact him directly if you have any questions. For now, let us proceed to look at how we would implement the DICOM verification SCU functionality using the PixelMed toolkit.The other option is to try another public server hosted by Dave Harvey here.
Implementing DICOM Verification
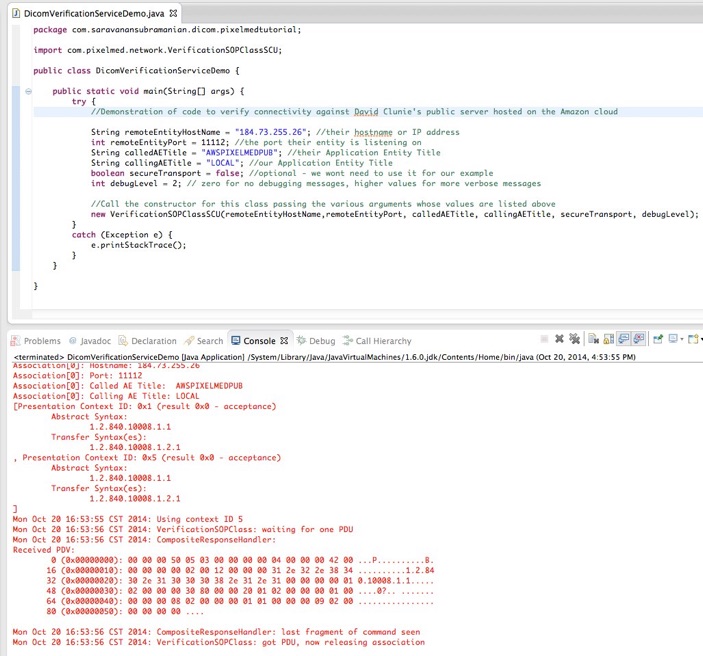
The PixelMed library provides a number of classes to perform DICOM networking-related operations. These classes can be found in the com.pixelmed.network package of the library. The class that we will use to demonstrate the DICOM Verification SCU operation is coincidentally also called VerificationSOPClassSCU class. Using this class is pretty straightforward. Simply instantiate the constructor of this class passing in the details of both the local and remote application entities as well as a value for the debugLevel parameter that helps control the amount of logging information you might wish to see of the entire operation. Running the code shown below on my machine resulted in a successful DICOM verification with David Clunie’s server. The console output (in red) shows the log of the operational activity during this connection. It throws an exception if it fails to connect. Don’t worry if you don’t understand all the information that was transferred between the two machines shown on the console. We will be covering that in detail in my tutorial on DICOM associations and negotiations to follow this tutorial.
    package com.saravanansubramanian.dicom.pixelmedtutorial;

    import com.pixelmed.network.VerificationSOPClassSCU;

    public class DicomVerificationServiceDemo {

        public static void main(String[] args) {
            try {
                //Demonstration of code to verify connectivity against David Clunie's public server hosted on the Amazon cloud

                String remoteEntityHostName = "184.73.255.26"; //their hostname or IP address
                int remoteEntityPort = 11112; //the port their entity is listening on
                String calledAETitle = "AWSPIXELMEDPUB"; //their Application Entity Title
                String callingAETitle = "LOCAL345"; //our Application Entity Title
                boolean secureTransport = false; //optional - we wont need to use it for our example
                int debugLevel = 2; // zero for no debugging messages, higher values for more verbose messages

                //Call the constructor for this class with the parameters
                //the API construct is a bit different in PixelMed for those you are used to invoking a 'command' method
                new VerificationSOPClassSCU(remoteEntityHostName,
                                            remoteEntityPort,
                                            calledAETitle,
                                            callingAETitle,
                                            secureTransport,
                                            2);

                //See documentation at: http://www.dclunie.com/pixelmed/software/javadoc/index.html
                //on the class VerificationSOPClassSCU
                //For successful connection, association negotiation and C-ECHO command success status
                //is indicated by the lack of an exception.
            }
            catch (Exception e) {

                //the following exceptions may be thrown if C-ECHO fails:
                //1. java.io.IOException
                //2. DicomException
                //3. DicomNetworkException - if the connection is refused, the association reqeust is reject,
                //or the C-ECHO command reports other than a success status

                e.printStackTrace(); //in real life, do something about this exception
            }
        }

    }
Screenshot below shows the program and the program console when running the code sample above:
Please note that I have only shown you Verification SCU functionality here. Later on, I will be showing you how to implement the Verification SCP functionality as well which is a recommended feature for all DICOM-enabled applications. I will first need to cover some material on abstract syntaxes and presentation contexts before I do this.
Testing Tools for DICOM Echo Verification
When you need to troubleshoot echo verification operations in DICOM, it will helpful to use one of the many useful DICOM testing tools out there. The one that I have used in the past and have liked is DCMTK. The toolkit comes with many standalone testing utilities that help you test various aspects related to DICOM processing through a command line interface. The echoscu command is the one that I will use here to verify connectivity with an Orthanc DICOM server installed and running locally on my machine on port 104. Please see detailed console output below showing the association request and responses between the two DICOM peers.
C:\SaravananDicomTestingTools\dcmtk-3.6.5-win64-dynamic\bin>echoscu.exe -d localhost 104
D: $dcmtk: echoscu v3.6.5 2019-10-28 $
D:
D: Request Parameters:
D: ====================== BEGIN A-ASSOCIATE-RQ =====================
D: Our Implementation Class UID:      1.2.276.0.7230010.3.0.3.6.5
D: Our Implementation Version Name:   OFFIS_DCMTK_365
D: Their Implementation Class UID:
D: Their Implementation Version Name:
D: Application Context Name:    1.2.840.10008.3.1.1.1
D: Calling Application Name:    ECHOSCU
D: Called Application Name:     ANY-SCP
D: Responding Application Name: ANY-SCP
D: Our Max PDU Receive Size:    16384
D: Their Max PDU Receive Size:  0
D: Presentation Contexts:
D:   Context ID:        1 (Proposed)
D:     Abstract Syntax: =VerificationSOPClass
D:     Proposed SCP/SCU Role: Default
D:     Proposed Transfer Syntax(es):
D:       =LittleEndianImplicit
D: Requested Extended Negotiation: none
D: Accepted Extended Negotiation:  none
D: Requested User Identity Negotiation: none
D: User Identity Negotiation Response:  none
D: ======================= END A-ASSOCIATE-RQ ======================
I: Requesting Association
D: setting network send timeout to 60 seconds
D: setting network receive timeout to 60 seconds
D: Constructing Associate RQ PDU
D: PDU Type: Associate Accept, PDU Length: 184 + 6 bytes PDU header
D:   02  00  00  00  00  b8  00  01  00  00  41  4e  59  2d  53  43
D:   50  20  20  20  20  20  20  20  20  20  45  43  48  4f  53  43
D:   55  20  20  20  20  20  20  20  20  20  00  00  00  00  00  00
D:   00  00  00  00  00  00  00  00  00  00  00  00  00  00  00  00
D:   00  00  00  00  00  00  00  00  00  00  10  00  00  15  31  2e
D:   32  2e  38  34  30  2e  31  30  30  30  38  2e  33  2e  31  2e
D:   31  2e  31  21  00  00  19  01  00  00  00  40  00  00  11  31
D:   2e  32  2e  38  34  30  2e  31  30  30  30  38  2e  31  2e  32
D:   50  00  00  3a  51  00  00  04  00  00  40  00  52  00  00  1b
D:   31  2e  32  2e  32  37  36  2e  30  2e  37  32  33  30  30  31
D:   30  2e  33  2e  30  2e  33  2e  36  2e  34  55  00  00  0f  4f
D:   46  46  49  53  5f  44  43  4d  54  4b  5f  33  36  34
D: Parsing an A-ASSOCIATE PDU
D: Association Parameters Negotiated:
D: ====================== BEGIN A-ASSOCIATE-AC =====================
D: Our Implementation Class UID:      1.2.276.0.7230010.3.0.3.6.5
D: Our Implementation Version Name:   OFFIS_DCMTK_365
D: Their Implementation Class UID:    1.2.276.0.7230010.3.0.3.6.4
D: Their Implementation Version Name: OFFIS_DCMTK_364
D: Application Context Name:    1.2.840.10008.3.1.1.1
D: Calling Application Name:    ECHOSCU
D: Called Application Name:     ANY-SCP
D: Responding Application Name: ANY-SCP
D: Our Max PDU Receive Size:    16384
D: Their Max PDU Receive Size:  16384
D: Presentation Contexts:
D:   Context ID:        1 (Accepted)
D:     Abstract Syntax: =VerificationSOPClass
D:     Proposed SCP/SCU Role: Default
D:     Accepted SCP/SCU Role: Default
D:     Accepted Transfer Syntax: =LittleEndianImplicit
D: Requested Extended Negotiation: none
D: Accepted Extended Negotiation:  none
D: Requested User Identity Negotiation: none
D: User Identity Negotiation Response:  none
D: ======================= END A-ASSOCIATE-AC ======================
I: Association Accepted (Max Send PDV: 16372)
I: Sending Echo Request (MsgID 1)
D: DcmDataset::read() TransferSyntax="Little Endian Implicit"
I: Received Echo Response (Success)
I: Releasing Association
Conclusion
This concludes my short introductory tutorial on DICOM networking where I covered the basics of DICOM verification which is an important feature that devices should implement to help during initial set ups as well as during any troubleshooting activity that occurs after. There are lot more things to talk about in the area of DICOM networking, and I will be covering most of these areas in my tutorials that are to follow. If you have any questions or comments regarding this tutorial, please feel free to send me an email. Please note that I may not get back to you right away due to work and other commitments. In my next tutorial, I will cover DICOM association/negotiations (or “handshaking”) in more detail whereby the entities actually request services from one another. See you then.