Automating PDF-related Structural Testing
Please note that this tutorial assumes that you have at least a rudimentary knowledge of Windows PowerShell scripting. If not, there are plenty of tutorials on the web to get you started. No other prerequisites will be required to follow along. One more thing to note is that although PowerShell enables a programmer to write a compact script through the use of aliased commands, I will be using the longer form of many commands to make the script a little easier to understand for the beginner.
Introduction
One of the frequent challenges especially in document-centric organizations where production of documents is often highly automated is to ensure that these documents are correct both structurally and semantically before they are transmitted both for internal and external consumption by other systems or users. Unlike XML which uses text format, PDF uses a binary format which stores both layout as well as content within the same document. Automated verification of the content within a PDF is relatively easy as you can leverage any of the number of PDF parsers available on the market. Structural verification during regression testing on the other hand is a different story altogether. Ensuring the document has not changed in appearance (fonts, labeling, table border widths, etc.) when any new functionality is added or when defects in a system are addressed is of utmost importance to business users especially in the client facing side. Over the years, both through practice and observation, I have discovered and implemented several interesting ways to overcome these challenges and wanted to share one such idea in this article. I will show how to set up a simple but robust framework for testing your PDF documents in a matter of minutes using several freely available tools on the Internet.
Absolute Minimum You Need to Know about PDF
Almost everyone who uses the Internet has heard about or used a PDF document. PDF stands for “Portable Document Format”, and was invented by Adobe, a large software technology company that has pioneered other interesting technologies such as PostScript, Flash, etc. A PDF document is a self-contained document which can be opened on almost any computer or mobile device using a PDF “reader” software specific to that platform. Adobe releases its own reader software called “Adobe Reader”, but you can use hundreds if not thousands of PDF readers produced by third party manufacturers around the world. Adobe’s original goal in releasing this technology was for the document to look the same on the screen when viewed or when printed regardless of the kind of computer or printer being used. Before the PDF standard was invented, it was nearly impossible to distribute a document to others on the Internet since most document standards available then only permitted them to be viewed on specific operating systems. PDF changed all that. Everything including formatting information such as fonts, styles, images, video, audio and text can all be embedded in a highly compressed form allowing for consistent rendering as well as distribution of the PDF document much more easily.
“If you wish to make an apple pie from scratch, you must first invent the universe.” ~ Carl Sagan
Over the last two decades, the PDF standard has evolved from its original form to support the rich functionality such as encryption, digital signatures, interactive forms, and rich media support including audio and video information. Since 2008, the PDF standard is no longer a proprietary standard. This is because Adobe released it as an open standard to make it much more accessible for collaboration and innovation. For the purposes of this tutorial, this is pretty much you need to know about PDF. I will illustrate how you can transform a PDF document into a series of images allowing you to take advantage of some extremely powerful image manipulation libraries which should permit us to implement extremely accurate testing of the structural aspects of a PDF document. However, if you want to dive deeper into how the PDF document is structured internally, please refer to this excellent article here.
Regression Testing
Before we can proceed and see how to write these tests let us take a quick minute to review what regression testing really means. A common problem and scenario that exists with any software implementation (especially ones that don’t have a well written suite of automated tests) is that something is unintentionally modified because of making another change in the software. Regression testing is a type of testing done to ensure that these unintended changes are caught and addressed before the software is released for use by the end users. Several challenges exist when doing regression testing manually. The main ones are, 1) it is extremely time consuming and tedious 2) it is inconsistent, meaning that the same test or tests may be done differently depending on who is testing it leading to different interpretations, and 3) it is subject to human frailty, by which I mean that when you are doing the same thing over and over, you lose focus and things simply slip your attention. This is where test automation helps. By making the tests scripted to run automatically, they can be run often, run the same way every time, and they catch things that would slip through even the most diligent tester.
Tools - PowerShell, PDFTK and ImageMagick Library and GhostScript
The approach we will look at in the article for testing PDFs for structural changes will be to convert the pages in the document to a series of images, and then use an image comparison program to detect the differences between a set of images from before and after. This is where PDFtk comes in. This is an cross-platform open source software that allows you to manipulate PDF documents. This tool has several other capabilities including splitting, merging, encrypting, decrypting, compressing, uncompressing, and repairing PDF documents although we will focus primarily on its ability to convert a PDF document into a series of individual PDF pages for the purposes of this tutorial. This tool is fairly straight forward to use and can run on a number of operating systems.
In addition to PDFtk, we also need another piece of software called ImageMagick. This is needed to convert the series of individual PDF pages (generated from the main document using PDFtk) into a series of images which can then be used for a number of image processing operations to follow including image comparison, overlays and stitching. ImageMagick is an open source image processing library that has proven track record of over 15 years or so. The documentation is well written, and there are plenty of examples to use or emulate. There are a number of published books on this tool as well. ImageMagick requires the use of another piece of software called GhostScript for PDF and PostScript-related processing. Something I want to mention here is that ImageMagick provides direct support for converting a multipage PDF document into a series of individual images. However, I find PDFtk much more powerful in manipulating PDF pages. I will leave it to you to decide the route to follow when you build your production-worthy application.
Let us now proceed to seeing how these tools can be “stitched together” to help build an automated regression testing framework to enable quality assurance activities around structural aspects for PDF (and PDF-exportable) documents. However, download the following software and install them on your machine before you proceed.
-
Download and install PDFtk from here
-
Download and install ImageMagick from here
-
Download and Install GhostSCript from here. Ensure that you GhostScript is included in your environment path variable
-
Ensure you have PowerShell enabled on your operating system
-
Download the full source code used in this tutorial from GitHub here.
Step 1: Convert PDF documents into a series of individual PDF pages
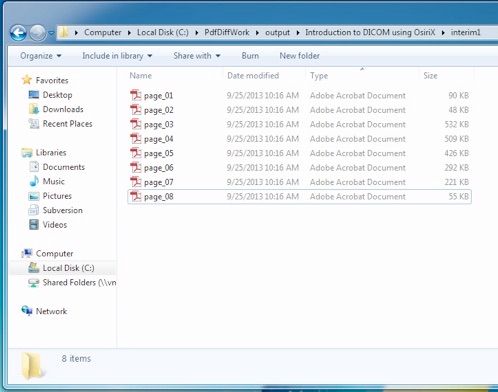
In this step, we are going to “burst” the two PDF documents to be compared into a series of single page PDF documents. This will enable us to subsequently convert these PDF pages into images and then compare the image equivalents of these pages using the ImageMagick image processing library. The PDFtk command that does this operation is called “burst”. You have the option of leaving PDFtk to provide default filenames or take control of how the individual files are named. The default naming format generates files with names such as pg_0001.pdf, pg_0002.pdf, etc. We will use this format for this tutorial. The PowerShell script that enables is shown below. The two multi-page PDF documents have now been converted to a series of individual PDF pages which are to be used as inputs for the next step in the automation which is to convert them into images. Please note that I am ignoring some best practices such as passing program settings using a configuration file for the purposes of keeping this tutorial short and focused. Running this script below will result in creation of a folder with the name of the document and will create two folders underneath the main output folder showing the main PDF document and the document being compared against broken into individual PDF pages. The screenshot showing the results of the operation is shown below this step’s code listing as well. Please note that I use the the grave accent looks (otherwise known as the “backtick”) to enable me to continue on the next line so that you can see a long line of code in my code listings below. Download the source code for this step here.
    #Location of where the ImageMagick convert program is installed
    $ImagemagickConvertApplication = "C:\PdfDiffWork\ImageMagick\convert.exe"
    $ImagemagickCompareApplication = "C:\PdfDiffWork\ImageMagick\compare.exe"
    $BurstPDFApplication="C:\PdfDiffWork\PDFtkServer\bin\pdftk.exe"
    #Location of first set of PDF files
    $InputFolder1 = "C:\PdfDiffWork\input1"
    #Location of second set of PDF files
    $InputFolder2 = "C:\PdfDiffWork\input2"
    #Location where the results of comparison operation will be archived
    $OutputFolder = "C:\PdfDiffWork\output"

    #This function bursts open the PDF file into individual PDF page files
    Function BurstAndCreateIndividualPagesOfInputFilesConsidered
    {
        Param ($inputfile, $outputfolder)
        #Split the PDF files into individual pages and create PDFs of each one of them
        $argument = "burst output " + "`'" + $outputfolder + "\page_%02d.pdf" + "`'"
        #Now, assemble the command line needed to burst open the second PDF file into individual pages
        $BurstPDFApplicationCmdLine = "& " + "`'" + $BurstPDFApplication + "`'" + " " + "`'" `
                                        + $inputfile + "`'" + " " + $argument

        try
        {
            echo $BurstPDFApplicationCmdLine
            #invoke the assembled command
            Invoke-Expression $BurstPDFApplicationCmdLine
            echo ("The PDF file " + $inputfile + " was successfuly burst open")
        }
        catch
        {
            throw ("Error attempting to burst PDF file " + $inputfile `
                    + " into individual pages. Error -> " + $_)
        }
    }
Screenshot showing the output of operation is seen below:
Step 2: Convert PDF pages into Images
The next step is to convert the individual PDF pages into images so that we can then use an image compare program to compare the pair of pages to be checked for differences. Both these steps can be easily accomplished using the ImageMagick image processing library. This is accomplished by the “convert” program that is included with the library. This program takes the horizontal and vertical density of the output image desired, the input PDF document and the name of the output image file desired. A small PowerShell function to accomplish this is shown below. The convert program takes numerous other parameters (nearly 100 arguments) and although many of them are very useful, I won’t cover them here as they are not required for the purposes of this tutorial. The code necessary to invoke this new function is also shown below the function. I will show you how these lines fit together with the main program later. The screenshot showing the results of the operation are shown below this step’s code listing as well. You should now see some JPEG format files that were created as the result of conversion of each of the individual PDF pages within both sets of documents being compared.
    #This function converts individual pdf files into JPEG images to enable image comparison operations
    Function ConvertIndividualPagePdfFileIntoJpegFile
    {
        Param ([string] $IndividualPagePdfFile)
        #convert PDF page file into a JPEG image
        #the image name will be the PDF file name appended with ".jpg" in the end
        [string] $JpegFileName = $IndividualPagePdfFile + ".jpg"
        #assemble the command that will invoked
        [string] $ConvertPDtoJPEGFApplicationCmdLine = $Imagemagickconvertapplication + " -quiet -density " `
                + "400x300" + " " + "`'" + $IndividualPagePdfFile + "`'" + " " + "`'" + $JpegFileName + "`'"

        try
        {
            Invoke-Expression $ConvertPDtoJPEGFApplicationCmdLine
            if ((Test-Path -Path $JpegFileName) -eq $true)
            {
                echo ("Conversion of PDF file " + $IndividualPagePdfFile `
                        + " to JPEG format was successful")
            }
        }
        catch
        {
            throw ("Error attempting to convert " + $IndividualPagePdfFile `
                    + " into jpeg format. Error -> " + $_)
        }
    }
Screenshot showing the output of operation is seen below:

Step 3: Compare Images/Generate Difference Image
Now that the PDF pages have been converted to JPG images, you can easily compare them using the “compare” program included as part of the ImageMagick library. This program takes the two images to be compared and the output filename as arguments and generates a “difference image” with any image pixels that are different shown in red colour. The pixels that are not different between the two images appear white. The only caveat to this whole operation is that the images that are being compared should be of the same size. The output format of the difference image is determined by the filename extension specified for the output filename. The PowerShell function that helps compare two images and generates an output difference image is shown below. The code needed in the main routine to invoke the function above is also shown below. Note, these lines follow from where we left of previously in Step 2. I will show you the whole program code listing later. Running the modified script will result in the creation of a “diff” folder underneath the output folder created for the document and will contain “difference” images generated by the ImageMagick compare program. A difference image generated due to the variation within the first pages of both PDF documents being compared against each other is shown below the code listing as well.
    #This function compares two images files and write the differences to another image file
    Function CompareImageFilesAndWriteDiffFile
    {
        Param ([string] $ImageFile1, [string] $ImageFile2, [string] $diffoutputfile)
        #assemble the command that will invoked
        [string] $CompareImagesApplicationCmdLine = $ImagemagickCompareApplication + " " + "`'" + $ImageFile1 `
        + "`'" + " " + "`'" + $ImageFile2 + "`'" + " " + "`'" + $diffoutputfile + "`'"

        try
        {
            Invoke-Expression $CompareImagesApplicationCmdLine
            if ((Test-Path -Path $diffoutputfile) -eq $true)
            {
                echo ("Difference operation was successful. Difference image " + $diffoutputfile `
                    + " was created successfully")
            }

        }
        catch
        {
            throw ("Error occured while comparing jpeg images " + $ImageFile1 + " and " + $ImageFile2 `
                    + ".Error -> " + $_)
        }
    }
“Don’t let the fear that testing can’t catch all bugs stop you from writing the tests that will catch most bugs” ~ Martin Fowler
Step 4: Stitch Original, New and Difference Images Together
To enable easy visualization of the differences between the original and the new PDF being compared, the three images namely, the original PDF image, the new PDF image and the difference image generated from the compare operation can be stitched together. This is achieved using the “convert” application which takes the three images and the stitched image name as arguments. The “+append” option of the convert program is specified when this operation is performed. The code needed in the main routine to invoke the function above is shown below the function listing as well. Again, these lines follow from where we left of previously in Step 3. I will show you the whole program code listing later. Running this modified code will result in the creation of a “quickview” folder which contains the results of the stitch operation. One of the stitched images as well as the folder view of the results are included below the code listing as well. Download the source code for this step here.
    #This function helps stitch the individual pages compared and the diff image generated in a three way image
    Function CreateThreeWayStitchedImage
    {
        Param ([string] $ImageFile1, [string] $ImageFile2, [string] $diffoutputJpegfile, [string] $stitchedfile)
        #assemble the command that will invoked
        [string] $StitchImagesApplicationCmdLine = $ImagemagickConvertApplication + " " + "`'" + $ImageFile1 + `
        "`'" + " " + "`'" + $ImageFile2 + "`'" + " " + "`'" + $diffoutputJpegfile + "`'" + " +append " `
        + "`'" + $stitchedfile + "`'"

        try
        {
            Invoke-Expression $StitchImagesApplicationCmdLine
            if ((Test-Path -Path $stitchedfile) -eq $true)
            {
                echo ("Stitch operation was successful. Stitched image " + $stitchedfile `
                + " was created successfully")
            }
        }
        catch
        {
            throw ("Error occured while stitching jpeg images " + $ImageFile1 + "," + $ImageFile2 `
            + " and " + $diffoutputJpegfile + " for three way review. Error -> " + $_)
        }
    }
Screenshot showing the output of operation is seen below:

Step 5: Create Complete Diff Report
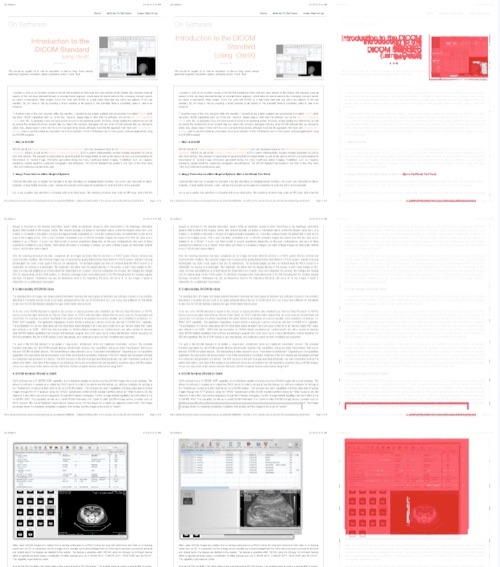
The last step is to stitch the three-way diff view images together into a complete report for each set of PDF documents considered. In this step, the previously stitched three-way images are then stitched one more time (this time horizontally) to create a full listing of all pages compared as well as the differences if any. This is achieved by using the convert program used in the previous step as well. A small PowerShell function that performs this operation is shown below. The code needed in the main routine to invoke this function above is shown below. Again, these lines follow from where we left of previously in Step 4. The full diff report produced is also shown below. As you can see, such a report enables one to quickly see all the differences for every PDF document compared very easily.
    #This function creates one single image which lists
    #all the individual side by side comparison images vertically
    Function CreateFullDiffViewImageFor
    {
        Param ([string] $processingFile, [string] $fullDiffReportOutputFolder)
        #stitch all the three way images vertically
        $stitchedimagefolder = $OutputFolder + "\" `
        + [System.IO.Path]::GetFileNameWithoutExtension($processingFile) + "\quickview"

        [bool] $DirectoryExists = Test-Path $stitchedimagefolder
        if ($DirectoryExists)
        {
            [string] $AllFilesInFolder = ""
            $stitchedimagesfiles = ls $stitchedimagefolder *.jpg
            $NumberOfStitchedImagesToCompileForDiffView = @(Get-Childitem $stitchedimagefolder *.jpg).Count
            echo ("Number of stitched images to compile into single image for diff view " `
                    + $NumberOfStitchedImagesToCompileForDiffView)

            if ($NumberOfStitchedImagesToCompileForDiffView -gt 0)
            {
                foreach($stitchedfile in $stitchedimagesfiles)
                {
                    $AllFilesInFolder = $AllFilesInFolder + " " + "`'" + $stitchedimagefolder + "\" `
                    + $stitchedfile + "`'"
                }
                [string] $outputfilename = $fullDiffReportOutputFolder + "\fulldiffview" `
                        + $FileNameWithoutExtension + ".jpg"
                [string] $StitchAllImagesApplicationCmdLine = $ImagemagickConvertApplication `
                        + " " + $AllFilesInFolder + " -append " + "`'" + $outputfilename + "`'"

                try
                {
                    Invoke-Expression $StitchAllImagesApplicationCmdLine
                    if ((Test-Path -Path $outputfilename) -eq $true)
                    {
                        echo ("Full diff view stitch operation was successful. Full diff view image "`
                        + $outputfilename + " was created successfully")
                    }

                }
                catch
                {
                    throw ("Error occured while stitching all three way compare images for " `
                    + " the input file considered. Error -> " + $_)
                }

            }
            elseif ($NumberOfStitchedImagesToCompileForDiffView -eq 0)
            {
                echo ("No diff images found to stitch together for full diff view operation")
            }
        }
    }
Screenshot showing the output of operation is seen below:
Source Code
You can also find the full source code used in the tutorial from GitHub here. Please ensure that you make the necessary adjustments to this code to make it production worthy before using it. Something I want to add here is that although this article talked about difference testing of PDF documents, in theory, you can use this tool to compare documents created originally in any other standard as along as they are ultimately converted to the PDF format before this script is used. Also, there is a port of the ImageMagick project called GraphicsMagick which can be substituted for ImageMagick if need be. However, as the two implementations are growing apart day by day, I cannot be 100% certain that the framework will work the same way with both these libraries.
Other Considerations
There are many advanced features that you can implement on top of the framework I describe here. This includes scenarios such as when the set of PDF files being compared against have different number of pages, when the pages are mismatched (meaning, you want to specify that for a certain PDF document, page 2 needs to be really compared against page 3 for instance), when the differences are so tiny and yet need to be caught, how to ignore minor pixel variations due to rendering issues or PDF driver variations which we would simply call “noise”, how to catch text variations only within the documents while ignoring other differences, etc. I will cover these and many other advanced and challenging scenarios in a future article.
Credits
Over the last decade, I have developed several testing frameworks while working on various projects for my clients, employers or for my own use, and the inspiration for developing those frameworks were often drawn from an article, a blog or a discussion forum on the Internet. The approach I describe is here is no exception. I was inspired to try out the approach to testing I describe here after reading an article from Adobe written by Timothy Oey many years ago (the article I referenced appears to be no longer accessible on the Adobe website). Please feel free to take the sample code provided here. Use it, modify or extend it, and share your enhancements to the community as well. If you have any questions or comments regarding these articles/tutorials, please feel free to send me an email. Please note that I may not get back to you right away due to work and other commitments.