DICOM Basics using Java - Making Sense of the DICOM File
Introduction
This is part of my series of articles on the DICOM standard. Before we get started on this tutorial, have a quick look at my earlier article titled “Introduction to the DICOM Standard” for a short and quick introduction to the standard. Please note that this tutorial assumes that you know Java (or any equivalent object-oriented language such as C# or C++).
I thought I will start this programming tutorial series on DICOM with an very high-level introduction to the DICOM file format. Please keep the official DICOM standard document at this link handy as many things I cover in this tutorial are explained in more detail there.
As you recall from my introductory DICOM tutorial, a DICOM file often contains image data and data about the patient in the same file using the concept of tags (to be explained later) like other image formats such as TIFF. However, the information stored in the DICOM file is far more structured and diverse than other standards in the form of a DICOM Dictionary. This dictionary (see page 23 of this document) to get an idea how comprehensive it is) which contains several thousand of these tags helps us encode information such as when and where the image was taken, who it belongs to, referring physician and even diagnosis information along with core image data. This minimizes the risk of attributing some critical healthcare information to a wrong patient.
Most DICOM files (sometimes seen with a '.dcm' extension - see footnote of this article) usually contain image data, and may sometimes even contain multiple images (or “frames” as they are often referred to in DICOM) to enable what is called a cine-loop which allows a DICOM viewer to visualize the entire sequence of images as a movie. However, DICOM files don’t necessarily have to be about images as most people assume and may be used to store other information such as reports, ECG signals and even audio (which we will cover later) as well.
“Writing is nature’s way of letting you know how sloppy your thinking is” ~ Richard Guindon
In the sections that follow below, we will first understand the basic structure (and syntax) of the DICOM file which permits applications that may be running on different operating systems and devices to exchange image and image-related information with one another easily. We will then use a freely available but extremely powerful DICOM toolkit called PixelMed Java DICOM toolkit to parse an actual DICOM file and see the content inside it relating back to the concepts we covered to help reinforce our understanding of the concepts covered. Please note that there is far more to the DICOM file than what I cover here, but for most developers like me who deal with processing of DICOM files using a toolkit or library, the information provided in this tutorial and others that follow should be more than sufficient to be up and running quickly. However, if you are interested in writing your own DICOM parser from scratch, you should read this document in detail.
A Look inside the DICOM File
Every DICOM file consists of three major parts, and we will now look at the role that each part plays in the overall scheme of things.
The first part, the file header, consists of a 128-byte file preamble followed by a 4-byte prefix. This approach is very common in many other image standards such as TIFF that you may have already seen/used. The 4-byte prefix consists of the uppercase characters 'DICM' (note, it is not “DICOM”, but “DICM”). The standard does not care how the preamble should be structured and what should be stored in it. The use of the file preamble from my understanding is to simply ensure compatibility or consistency for the processing application to deal with DICOM files just like several other existing image file formats. The standard does not care about what you store in it or how you use it. So, in theory, your application could completely skip over this data when parsing the DICOM file if you chose to.
Before we look at the next part of the DICOM file, something needs to be said about the concept of transfer syntax and its role in the DICOM standard. If you recall from my earlier tutorial, the DICOM standard enables devices to transfer information with each other even if they are running on different operating systems. Different operating systems and devices follow different formats for storing data such as byte ordering when they store binary data. Due to heavy network requirements for exchange of large imagery generated from the scanning modalities such as CT or MR, the standard also has provisions to exchange image data using compression when/if necessary. In my introductory tutorial on DICOM, we also learnt about implicit and explicitVR encoding as well. All three criteria (the type of VR encoding, the type of byte ordering and the compression utilized) must first be understood and agreed upon to ensure that the two DICOM systems exchanging information understand each other during any communication between them. The transfer syntax is a set of encoding rules that helps specify this criteria through the use of UIDs which we also learnt about in my introductory tutorial on DICOM. For example, Implicit VR Little-endian (indicated by an UID value of 1.2.840.10008.1.2), Explicit VR Little-endian (value - 1.2.840.10008.1.2.1), Explicit VR Big-endian (value - 1.2.840.10008.1.2.2) and JPEG Lossless (value - 1.2.840.10008.1.2.4.57) are some of the transfer syntaxes available for DICOM processing. I will cover these in more detail when discussing image pixel data processing in a future tutorial in my DICOM series.
Now that we understand what transfer syntax is in brief (there is more to this including presentation context which I will cover in a later tutorial), let us look at the next part of the file namely the file meta-information header. This section follows immediately after the file header and consists of a data set consisting of a sequence of tagged information (called “Dicom Elements”) which specifies details such as the transfer syntax (explained above) as well as other information regarding the device or implementation that created this file and for whom this information was created for (the receiving application). See Page 32 of this document for detailed information.
Following this section is the third and last part of the DICOM file and is the data object. This part of the DICOM file is also specified in the form of a data set consisting of a series of tags which may in turn be nested and carry additional child tags themselves. These tags help carry information about the SOP instance (see my introductory tutorial for what SOP means) such as the study, the series, the patient that it belongs to as well as other details regarding the image such as image pixel data, scan position data, etc. The study, series and patient information is often used to index the image in most PACS systems for faster retrieval of data. My illustration below should hopefully provide a synopsis of the overall file structure also showing how individual DICOM elements (each element includes the tag and the associated information) are part of the whole structure.
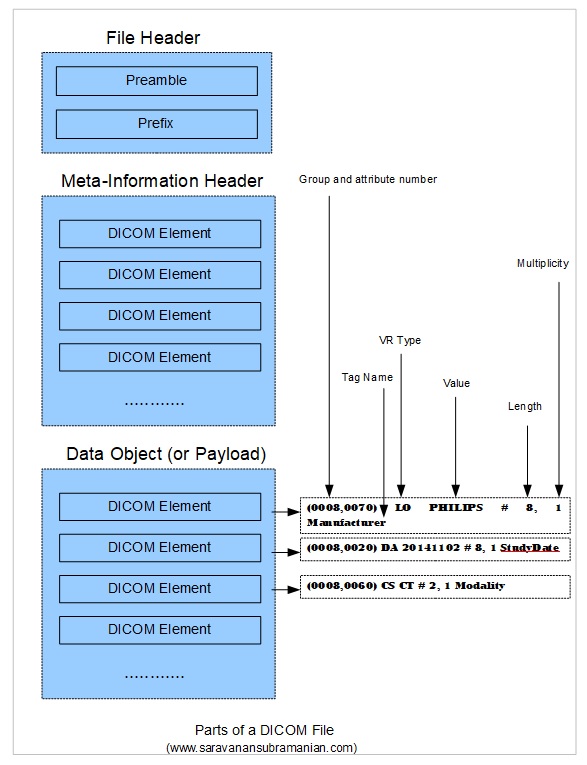
For example, in the first of the three DICOM elements in the data object section shown in my illustration above, ‘(0008, 0070)’ indicates a tag belonging to group number of 0008 with an attribute number of 0070, the ‘LO’ indicates the data type or the Value Representation (VR) as DICOM calls it (LO refers to the Long String data type), ‘PHILIPS’ is the actual value of the tag, ‘#8’ helps specify the length of the value of 8 (please note that DICOM always encodes data using an even number of characters for text so an extra padding character is used even though the value PHILIPS is only 7 characters long - more on this later), 1 represents the value multiplicity here (some data can be repeated), and ‘Manufacturer’ is the actual tag name as specified within the DICOM dictionary. The group and attribute number, the VR, the value, the value multiplicity and the tag name combined are referred to as an DICOM Element. Since the DICOM dictionary (see page 23 and onwards) implicitly defines the VR associated with each tag, the VR is redundant and is sometimes omitted. Despite this, a common practice and recommendation is to explicitly specify the VR when serializing DICOM objects into files or when exchanging DICOM information across the network. When I discuss the transfer syntax in more detail in a later tutorial, I will cover both the implicit transfer syntax (where VR is omitted) and the explicit transfer syntax (where the VR is specified along with the tag) in more detail. Now, we are in a better position to understand what an IOD (Information Object Definition) is. Let us proceed.
What do these terms really mean in DICOM - SCU, SCP, SOP and IOD?
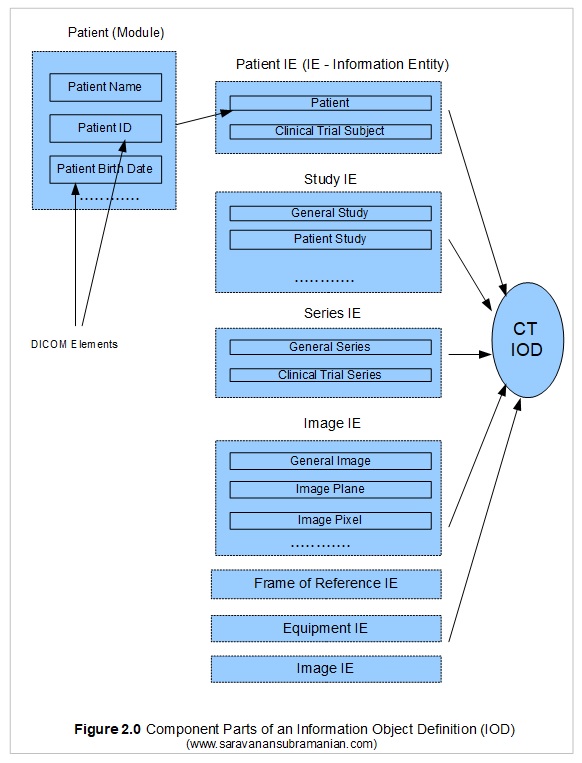
DICOM defines the concepts of services and data that the services use or act upon. An example of a service may be a CT Store service which is responsible for storing an image generated from a CT modality to a PACS server. There are two parts to the service, the consumer of the service also known as a Service Class User or SCU, and the provider of the service also known as a Service Class Provider or SCP. In the CT Store operation for instance, the modality that generates the image acts as a C-Store SCU and transmits the data for storage to the C-Store SCP which is played by the PACS server. In the DICOM standard, the combination of the service classes and the objects that are involved with those services are known as Service Object Pairs or SOPs. The abstract definition of an SOP is called a SOP Class, and these are defined by unique identifiers (called UIDs) which I cover soon (see this link for a list of SOPs). So, the SOP CT Image Storage which is identified by a SOP Class UID of 1.2.840.10008.5.1.4.1.1.2 helps identify that this is a CT Image Storage operation. During this operation between the machines involved, there is an exchange of commands (called DIMSEs which I cover later) as well as some data which includes the image pixel information along with other identifying information such as patient, study, series and equipment information. Together, these concrete details for that operation are known as a SOP Instance. Each of these SOP instances are also identified by an unique identifier but are generated by the application responsible for transmitting them. These identifiers are called SOP Instance UIDs. The actual data involved with this SOP is defined by an IOD (Information Object Definition) specifying what DICOM modules (modules are essentially groups of DICOM elements) need to be present for successful completion of processing.
The IOD objects are themselves broken into sub groups called Information Entities (abbreviated to IE), and the Information Entities are in return broken into small groups of Information Modules. The Information Modules comprise of a series of DICOM elements which we have already seen. DICOM defines rules on what modules are mandatory, what are conditionally present as well as what are optional. The IODs themselves are classified into Normalized IODs and Composite IODs. Normalized IODs represent data pertaining to one entity only whereas Composite IODs represents data from a mixture of various entities that are related to one another as shown in my illustration below. This is essentially the grand structure of DICOM information model in summary. Putting this all together you will now see that any DICOM file that we have dealt so far is really an instance of an IOD (a serialized version of information) that is also transmitted between two machines during any imaging workflow. And in the case we were looking at, the operation to help store an image generated by a CT modality onto a PACS server. There is more to DICOM IODs and encoding than what is covered here, but we will deal with those areas when discussing creating DICOM files and directories. I didn’t want to bore you to death, but this is all you need to know for now.
The PixelMed Java DICOM Toolkit - Quick Overview
For the purposes of illustrating many aspects of DICOM that I plan to cover in this tutorial series, I will be using a freely available and powerful DICOM toolkit called PixelMed Java DICOM Toolkit. This is a completely stand-alone DICOM toolkit that provides functionality for DICOM file and directory processing, image viewing as well as DICOM networking-related operations. This toolkit is completely free for both commercial or non-profit use. It is well documented and also has a small discussion forum and mailing list for users. The list of features contained within this toolkit is quite comprehensive. Please keep in mind that the use of this toolkit in my tutorial does not in anyway imply my official endorsement of it for implementing a production application. Every situation is unique, and only you are ultimately in the best position to decide that. This article is also not meant to be a tutorial on this toolkit, and my focus here is simply to tie DICOM theory to what a practical (although simple) implementation might look like. So, if your goal is to learn how to use the PixelMed library, I would encourage you to visit its website or check out the discussion forum or StackOverflow discussion pages for any assistance.
Before We Get Started…
Much like my previous programming examples, I will use the most bare minimum code and approach to help illustrate the concepts that I cover in this tutorial. This means that the code I write here is best suited to simply show the concept that I am trying to explain and is not necessarily the most efficient code to deploy in real life and in your production application.
To get started, you will need to configure a few things on your machine including a Java development environment as well as the PixelMed toolkit before you can run the example if you want to try this out yourself.
- Download and install the Eclipse Java IDE from here (or use any other IDE you prefer)
- Download the PixelMed toolkit library from here
- Ensure that the PixelMed.jar library is included in your Java project’s class path (some examples may require additonal runtime dependencies such as JAI Image IO Tools that can be found on PixelMed software download. Look for a tar compressed file called pixelmedjavadicom_dependencyrelease.YYYYMMDD.tar.bz2 or something similar)
- You can find the source code used in this tutorial on GitHub
- You can download more DICOM images from this site if you want as well
Listing Various Tags of a DICOM file to Console
To read and extract the DICOM tag information using the PixelMed toolkit is pretty straightforward. There are only two classes needed for this operation namely AttributeList and Attribute. The AttributeList class provides methods for reading (and writing) entire DICOM objects as a list of attributes from files or from streams. The constructor of this class takes the path to the DICOM file you want to process. The Attribute class on the other hand deals with reading and writing DICOM attributes. The use of these classes to display the DICOM elements that are of interest to us is shown below.
    package com.saravanansubramanian.dicom.pixelmedtutorial;

    import com.pixelmed.dicom.Attribute;
    import com.pixelmed.dicom.AttributeList;
    import com.pixelmed.dicom.AttributeTag;
    import com.pixelmed.dicom.TagFromName;

    public class DumpDicomTagsToConsole {

        private static AttributeList list = new AttributeList();

        public static void main(String[] args) {
            String dicomFile = "D:\\JavaProjects\\Sample Images\\MR-MONO2-16-head";
            try {
                list.read(dicomFile);

                System.out.println("Study Instance UID:" + getTagInformation(TagFromName.StudyInstanceUID));
                System.out.println("Series Instance UID:" + getTagInformation(TagFromName.SeriesInstanceUID));
                System.out.println("SOP Class UID:" + getTagInformation(TagFromName.SOPClassUID));
                System.out.println("SOP Instance UID:" + getTagInformation(TagFromName.SOPInstanceUID));
                System.out.println("Transfer Syntax UID:" + getTagInformation(TagFromName.TransferSyntaxUID));

            } catch (Exception e) {
                e.printStackTrace(); //in real life, do something about this exception
            }
        }

        private static String getTagInformation(AttributeTag attrTag) {
            return Attribute.getDelimitedStringValuesOrEmptyString(list, attrTag);
        }

    }
Output of running the code above is shown below:
Study Instance UID:1.2.840.113619.2.1.3352.2053053415.834484316
Series Instance UID:1.2.840.113619.2.1.3352.1136944889.4.834485379
SOP Class UID:1.2.840.10008.5.1.4.1.1.4
SOP Instance UID:1.2.840.113619.2.1.3352.1015047400.4.3.834485381
Transfer Syntax UID:1.2.840.10008.1.2
Listing All Tags of a DICOM file to Console
Listing the DICOM file’s entire attributes is fine, but sometimes, you simply want to selectively display only specific tags contained in the DICOM file including the group and attribute number, the value representation (VR), the value, the value length, value multiplicity and the tag name information which I described earlier in this tutorial. This process is easily achieved by using the toString method of AttributeList class contained in the PixelMed library. Code illustration of the operation is show below.
    package com.saravanansubramanian.dicom.pixelmedtutorial;

    import com.pixelmed.dicom.AttributeList;

    public class DumpDicomFileContentsToConsole {

        public static void main(String[] args) {
            String dicomFile = "D:\\JavaProjects\\Sample Images\\MR-MONO2-16-head";
            try {
                AttributeList list = new AttributeList();
                list.read(dicomFile);
                System.out.println(list.toString());

            } catch (Exception e) {
                e.printStackTrace();
            }
        }
    }
Output of running the code above is shown below:
(0x0002,0x0000) FileMetaInformationGroupLength VR=<UL> VL=<0x4> [0xba]
(0x0002,0x0001) FileMetaInformationVersion VR=<OB> VL=<0x2> []
(0x0002,0x0010) TransferSyntaxUID VR=<UI> VL=<0x12> <1.2.840.10008.1.2 >
(0x0002,0x0012) ImplementationClassUID VR=<UI> VL=<0x18> <1.2.276.0.7230010.3.1.2 >
(0x0002,0x0013) ImplementationVersionName VR=<SH> VL=<0x10> <OFFIS-DCMTK-301 >
(0x0008,0x0000) VR=<UN> VL=<0x4> [B@681a9515
(0x0008,0x0008) ImageType VR=<CS> VL=<0x10> <ORIGINAL\PRIMARY>
(0x0008,0x0016) SOPClassUID VR=<UI> VL=<0x1a> <1.2.840.10008.5.1.4.1.1.4 >
(0x0008,0x0018) SOPInstanceUID VR=<UI> VL=<0x30> <1.2.840.113619.2.1.3352.1015047400.4.3.834485381>
(0x0008,0x0020) StudyDate VR=<DA> VL=<0xa> <1996.06.11>
(0x0008,0x0021) SeriesDate VR=<DA> VL=<0xa> <1996.06.11>
(0x0008,0x0023) ContentDate VR=<DA> VL=<0xa> <1996.06.11>
(0x0008,0x0030) StudyTime VR=<TM> VL=<0x8> <09:11:56>
(0x0008,0x0031) SeriesTime VR=<TM> VL=<0x8> <09:29:39>
(0x0008,0x0033) ContentTime VR=<TM> VL=<0x8> <09:29:41>
(0x0008,0x0060) Modality VR=<CS> VL=<0x2> <MR>
(0x0008,0x0070) Manufacturer VR=<LO> VL=<0x12> <GE MEDICAL SYSTEMS>
(0x0008,0x0080) InstitutionName VR=<LO> VL=<0x20> <PALO ALTO MEDICAL FOUNDATION MRI>
(0x0008,0x0090) ReferringPhysicianName VR=<PN> VL=<0xa> <Anonymized>
(0x0008,0x1010) StationName VR=<SH> VL=<0x8> <MROCOC0 >
(0x0008,0x1030) StudyDescription VR=<LO> VL=<0x4> <HEAD>
(0x0008,0x103e) SeriesDescription VR=<LO> VL=<0x6> <FLAIR >
(0x0008,0x1060) NameOfPhysiciansReadingStudy VR=<PN> VL=<0xa> <Anonymized>
(0x0008,0x1070) OperatorsName VR=<PN> VL=<0xa> <Anonymized>
(0x0008,0x1090) ManufacturerModelName VR=<LO> VL=<0xe> <GENESIS_SIGNA >
(0x0010,0x0000) VR=<UN> VL=<0x4> [B@681a9515
(0x0010,0x0010) PatientName VR=<PN> VL=<0xa> <Anonymized>
(0x0018,0x0000) VR=<UN> VL=<0x4> [B@681a9515
(0x0018,0x0010) ContrastBolusAgent VR=<LO> VL=<0x4> <NONE>
(0x0018,0x0020) ScanningSequence VR=<CS> VL=<0x2> <RM>
(0x0018,0x0021) SequenceVariant VR=<CS> VL=<0x4> <NONE>
(0x0018,0x0022) ScanOptions VR=<CS> VL=<0x16> <GRAPH_GEMS\FC\EDR_GEMS>
(0x0018,0x0023) MRAcquisitionType VR=<CS> VL=<0x2> <2D>
(0x0018,0x0024) SequenceName VR=<SH> VL=<0x6> <flair >
(0x0018,0x0025) AngioFlag VR=<CS> VL=<0x2> <Y >
(0x0018,0x0050) SliceThickness VR=<DS> VL=<0x8> <5.000000>
(0x0018,0x0080) RepetitionTime VR=<DS> VL=<0xc> <10002.000000>
(0x0018,0x0081) EchoTime VR=<DS> VL=<0xa> <159.500000>
(0x0018,0x0083) NumberOfAverages VR=<DS> VL=<0x8> <1.000000>
(0x0018,0x0084) ImagingFrequency VR=<DS> VL=<0xe> <63.8609400000 >
(0x0018,0x0085) ImagedNucleus VR=<SH> VL=<0x2> <H1>
(0x0018,0x0086) EchoNumbers VR=<IS> VL=<0x2> <1 >
(0x0018,0x0087) MagneticFieldStrength VR=<DS> VL=<0x6> <15000 >
(0x0018,0x0088) SpacingBetweenSlices VR=<DS> VL=<0x8> <6.000000>
(0x0018,0x0091) EchoTrainLength VR=<IS> VL=<0x2> <0 >
(0x0018,0x0093) PercentSampling VR=<DS> VL=<0xa> <100.000000>
(0x0018,0x0094) PercentPhaseFieldOfView VR=<DS> VL=<0xa> <100.000000>
(0x0018,0x0095) PixelBandwidth VR=<DS> VL=<0xa> <167.187500>
(0x0018,0x1020) SoftwareVersions VR=<LO> VL=<0x2> <04>
(0x0018,0x1050) SpatialResolution VR=<DS> VL=<0x12> <1.145833\0.859375 >
(0x0018,0x1088) HeartRate VR=<IS> VL=<0x2> <0 >
(0x0018,0x1090) CardiacNumberOfImages VR=<IS> VL=<0x2> <0 >
(0x0018,0x1094) TriggerWindow VR=<IS> VL=<0x2> <0 >
(0x0018,0x1100) ReconstructionDiameter VR=<DS> VL=<0xe> <220.0000000000>
(0x0018,0x1250) ReceiveCoilName VR=<SH> VL=<0x4> <HEAD>
(0x0018,0x1251) TransmitCoilName VR=<SH> VL=<0x4> <HEAD>
(0x0018,0x1312) InPlanePhaseEncodingDirection VR=<CS> VL=<0x4> <COL >
(0x0018,0x1314) FlipAngle VR=<DS> VL=<0x2> <90>
(0x0018,0x1315) VariableFlipAngleFlag VR=<CS> VL=<0x2> <N >
(0x0018,0x1316) SAR VR=<DS> VL=<0x8> <0.015446>
(0x0018,0x5100) PatientPosition VR=<CS> VL=<0x4> <HFS >
(0x0020,0x0000) VR=<UN> VL=<0x4> [B@681a9515
(0x0020,0x000d) StudyInstanceUID VR=<UI> VL=<0x2c> <1.2.840.113619.2.1.3352.2053053415.834484316>
(0x0020,0x000e) SeriesInstanceUID VR=<UI> VL=<0x2e> <1.2.840.113619.2.1.3352.1136944889.4.834485379>
(0x0020,0x0011) SeriesNumber VR=<IS> VL=<0x2> <4 >
(0x0020,0x0012) AcquisitionNumber VR=<IS> VL=<0x2> <1 >
(0x0020,0x0013) InstanceNumber VR=<IS> VL=<0x2> <3 >
(0x0020,0x0032) ImagePositionPatient VR=<DS> VL=<0x24> <-110.000000\ -109.800003\-47.500000 >
(0x0020,0x1040) PositionReferenceIndicator VR=<LO> VL=<0x2> <NA>
(0x0020,0x1041) SliceLocation VR=<DS> VL=<0xe> <-47.5000000000>
(0x0028,0x0000) VR=<UN> VL=<0x4> [B@681a9515
(0x0028,0x0002) SamplesPerPixel VR=<US> VL=<0x2> [0x1]
(0x0028,0x0004) PhotometricInterpretation VR=<CS> VL=<0xc> <MONOCHROME2 >
(0x0028,0x0010) Rows VR=<US> VL=<0x2> [0x100]
(0x0028,0x0011) Columns VR=<US> VL=<0x2> [0x100]
(0x0028,0x0030) PixelSpacing VR=<DS> VL=<0x12> <0.859375\0.859375 >
(0x0028,0x0100) BitsAllocated VR=<US> VL=<0x2> [0x10]
(0x0028,0x0101) BitsStored VR=<US> VL=<0x2> [0x10]
(0x0028,0x0102) HighBit VR=<US> VL=<0x2> [0xf]
(0x0028,0x0103) PixelRepresentation VR=<US> VL=<0x2> [0x1]
(0x7fe0,0x0000) VR=<UN> VL=<0x4> [B@681a9515
(0x7fe0,0x0010) PixelData VR=<OW> VL=<0x20000>
Using DICOM Testing Tools
If you want to dig deeper into this area, you can use one of the many useful DICOM testing tools out there. The one that I have used in the past and have liked is DCMTK. The toolkit comes with many standalone testing utilities that help you test various aspects related to DICOM processing through a command line interface. Running the dcmdump command on a sample DICOM file results in an output as seen below.
c:\DicomTestingTools\DCMTK-3.6.3-Win64-Dynamic\bin>dcmdump.exe sampledicomfile.dcm

# Dicom-File-Format

# Dicom-Meta-Information-Header
# Used TransferSyntax: Little Endian Explicit
(0002,0000) UL 184                                      #   4, 1 FileMetaInformationGroupLength
(0002,0001) OB 00\01                                    #   2, 1 FileMetaInformationVersion
(0002,0002) UI =OphthalmicPhotography8BitImageStorage   #  32, 1 MediaStorageSOPClassUID
(0002,0003) UI [2.25.101703809854595919801950834747690813074] #  44, 1 MediaStorageSOPInstanceUID
(0002,0010) UI =LittleEndianExplicit                    #  20, 1 TransferSyntaxUID
(0002,0012) UI [1.3.6.1.4.1.30071.8]                    #  20, 1 ImplementationClassUID
(0002,0013) SH [fo-dicom 4.0.1]                         #  14, 1 ImplementationVersionName

# Dicom-Data-Set
# Used TransferSyntax: Little Endian Explicit
(0008,0008) CS [ORIGINAL\PRIMARY]                       #  16, 2 ImageType
(0008,0016) UI =OphthalmicPhotography8BitImageStorage   #  32, 1 SOPClassUID
(0008,0018) UI [2.25.101703809854595919801950834747690813074] #  44, 1 SOPInstanceUID
(0008,0020) DA [20200501]                               #   8, 1 StudyDate
(0008,002a) DT [20200501071652]                         #  14, 1 AcquisitionDateTime
(0008,0030) TM [071652]                                 #   6, 1 StudyTime
(0008,0050) SH [125]                                    #   4, 1 AccessionNumber
(0008,0060) CS [US]                                     #   2, 1 Modality
(0008,0061) CS [OP]                                     #   2, 1 ModalitiesInStudy
(0008,0070) LO [Medicolle]                              #  10, 1 Manufacturer
(0008,0080) LO [Test Hospital]                          #  14, 1 InstitutionName
(0008,0081) ST (no value available)                     #   0, 0 InstitutionAddress
(0008,0090) PN [Fergusson^^^Dr]                         #  14, 1 ReferringPhysicianName
(0008,1010) SH [AdvancedCapture]                        #  16, 1 StationName
(0008,1030) LO (no value available)                     #   0, 0 StudyDescription
(0008,1090) LO [AdvancedCapture]                        #  16, 1 ManufacturerModelName
(0010,0010) PN [Bowen^William^^Dr]                      #  18, 1 PatientName
(0010,0020) LO [PAT004]                                 #   6, 1 PatientID
(0010,0030) DA [19560807]                               #   8, 1 PatientBirthDate
(0010,0040) CS [M]                                      #   2, 1 PatientSex
(0010,1030) DS (no value available)                     #   0, 0 PatientWeight
(0018,1000) LO (no value available)                     #   0, 0 DeviceSerialNumber
(0018,1020) LO [AdvancedCapture 3.0.7425.23917]         #  30, 1 SoftwareVersions
(0018,106a) CS [NO TRIGGER]                             #  10, 1 SynchronizationTrigger
(0018,1800) CS [N]                                      #   2, 1 AcquisitionTimeSynchronized
(0020,000d) UI [1.2.826.0.1.3680043.11.106]             #  26, 1 StudyInstanceUID
(0020,000e) UI [2.25.103253814587692535336175589446854494919] #  44, 1 SeriesInstanceUID
(0020,0010) SH [1]                                      #   2, 1 StudyID
(0020,0011) IS [1]                                      #   2, 1 SeriesNumber
(0020,0013) IS [1]                                      #   2, 1 InstanceNumber
(0020,0020) CS [F\A]                                    #   4, 2 PatientOrientation
(0020,0062) CS [R]                                      #   2, 1 ImageLaterality
(0020,0200) UI =UniversalCoordinatedTimeSynchronizationFrameOfReference #  20, 1 SynchronizationFrameOfReferenceUID
(0020,1206) IS [1]                                      #   2, 1 NumberOfStudyRelatedSeries
(0020,1208) IS [1]                                      #   2, 1 NumberOfStudyRelatedInstances
(0020,1209) IS [1]                                      #   2, 1 NumberOfSeriesRelatedInstances
(0022,000a) FL 0                                        #   4, 1 EmmetropicMagnification
(0022,000c) FL 0                                        #   4, 1 HorizontalFieldOfView
(0022,000e) FL 0                                        #   4, 1 DegreeOfDilation
(0022,0015) SQ (Sequence with undefined length #=1)     # u/l, 1 AcquisitionDeviceTypeCodeSequence
  (fffe,e000) na (Item with undefined length #=1)         # u/l, 1 Item
    (0008,0104) LO (no value available)                     #   0, 0 CodeMeaning
  (fffe,e00d) na (ItemDelimitationItem)                   #   0, 0 ItemDelimitationItem
(fffe,e0dd) na (SequenceDelimitationItem)               #   0, 0 SequenceDelimitationItem
(0022,0016) SQ (Sequence with undefined length #=1)     # u/l, 1 IlluminationTypeCodeSequence
  (fffe,e000) na (Item with undefined length #=0)         # u/l, 1 Item
  (fffe,e00d) na (ItemDelimitationItem)                   #   0, 0 ItemDelimitationItem
(fffe,e0dd) na (SequenceDelimitationItem)               #   0, 0 SequenceDelimitationItem
(0022,0019) SQ (Sequence with undefined length #=1)     # u/l, 1 LensesCodeSequence
  (fffe,e000) na (Item with undefined length #=0)         # u/l, 1 Item
  (fffe,e00d) na (ItemDelimitationItem)                   #   0, 0 ItemDelimitationItem
(fffe,e0dd) na (SequenceDelimitationItem)               #   0, 0 SequenceDelimitationItem
(0028,0002) US 3                                        #   2, 1 SamplesPerPixel
(0028,0004) CS [RGB]                                    #   4, 1 PhotometricInterpretation
(0028,0006) US 0                                        #   2, 1 PlanarConfiguration
(0028,0008) IS [1]                                      #   2, 1 NumberOfFrames
(0028,0010) US 1920                                     #   2, 1 Rows
(0028,0011) US 1920                                     #   2, 1 Columns
(0028,0100) US 8                                        #   2, 1 BitsAllocated
(0028,0101) US 8                                        #   2, 1 BitsStored
(0028,0102) US 7                                        #   2, 1 HighBit
(0028,0103) US 0                                        #   2, 1 PixelRepresentation
(0040,0555) SQ (Sequence with undefined length #=1)     # u/l, 1 AcquisitionContextSequence
  (fffe,e000) na (Item with undefined length #=0)         # u/l, 1 Item
  (fffe,e00d) na (ItemDelimitationItem)                   #   0, 0 ItemDelimitationItem
(fffe,e0dd) na (SequenceDelimitationItem)               #   0, 0 SequenceDelimitationItem
(7fe0,0010) OB 00\00\00\00\00\00\00\00\00\00\00\00\00\00\00\00\00\00\00\00\00\00... # 11059200, 1 PixelData

c:\DicomTestingTools\DCMTK-3.6.3-Win64-Dynamic\bin>
Conclusion
That is it. This is all there is to performing some rudimentary processing of a DICOM file. I hope this introductory tutorial helped you in understanding what is contained within a DICOM file. I didn’t touch on how to extract the image pixel data that is stored inside the DICOM file that we processed. I hope to cover that in a separate tutorial in the near future. But in my next DICOM tutorial I will show you how to encode/create a DICOM file from scratch using an image as well as some associated information. If you have any questions or comments regarding this tutorial, please feel free to send me an email. Please note that I may not get back to you right away due to work and other commitments.
Footnote: The DICOM standard restricts the file names/identifiers contained within to 8 characters (either uppercase alphabetic characters and numbers only) to keep in conformity with legacy/historical requirements. It also states that no information must be inferred/extracted from these names. The file names usually don’t have a .dcm extension when they are stored as part of a media such as CD or DVD. I use longer names to keep these details from being a distraction right now, but I still want to mention what the standard states here so that no confusion arises as a result.