DICOM Basics using Java - Creating a DICOM File
Introduction
This is part of my series of articles on the DICOM standard. Before we get started on this tutorial, have a quick look at my earlier article titled “Introduction to the DICOM Standard” for a short and quick introduction to the standard. As this tutorial requires some understanding of the structure of the DICOM file, please also have a look at my other tutorial titled “DICOM Basics using Java - Making Sense of the DICOM File”. This tutorial also assumes that you know the basics of Java or any equivalent object-oriented language such as C# or C++.
In this tutorial, I will illustrate how to create a DICOM file from scratch using a simple JPEG image that you already have. This is referred to as "Secondary Image Capture" operation in DICOM. This operation is generally to be avoided as much as possible since there is greater risk of encoding both image pixel data as well as associating with other non-image data for the image. However, this approach is sometimes necessary when a clinic for instance doesn’t have a DICOM-compliant modality or when you have plain film, text reports, or when you want to take screenshots and need to store them in your PACS server. Let us proceed to look at how to implement this functionality when required, but let us understand or review a few more DICOM terms first.
Transfer Syntax
In my previous tutorial that covered the contents of a DICOM file, I briefly touched on what a transfer syntax is and the role it plays in ensuring that any two devices running on completely different operating systems can still exchange DICOM information with one another by negotiating the VR encoding, byte ordering and the compression mechanisms used for encoding/decoding the DICOM file. There are two types of byte ordering namely, Little Endian and Big Endian. Little Endian, also known as the “Intel” or “MS Windows OS” format, refers to a type of encoding where the least-significant byte appears first and the higher order bytes follow in ascending order of significance. Big-Endian, also known as the “Motorola” format” or “Mac OS format”, refers to a type of encoding where the most-significant byte appears first and remaining bytes follow in descending order of significance. Another aspect of the transfer syntax is the type of VR encoding utilized ('implicit' or 'explicit'). In the explicit encoding, the data type of the DICOM attributes in explicitly specified whereas this is left out in implicit encoding leaving the attribute to understood purely using the DICOM tag number that is specified. In addition to the byte ordering and VR encoding, the type of compression (or lack of) is also required to encode DICOM data (can be 'uncompressed', lossy' or 'lossless'). The combination of VR encoding, byte ordering and compression mechanisms used effectively forms a 'transfer syntax' in DICOM. See this link for the list of transfer syntaxes specified in DICOM.
Unique Identifiers (or UIDs)
Unique identifiers, as the name implies, enable identification of information in a distributed environment. Although they don’t always guarantee it, the intent is often to strive for uniqueness within the context of an environment in which they are used. Their use in a healthcare environment is extremely important to ensure that any data related to an entity such as a study, series or an image is never confused for something else. Even when an image is only slightly altered, the original and the altered images are given unique identifiers to ensure that we are referencing the right image during any diagnosis procedures (think of every DICOM file that you deal with as a non-modifiable file and if you do alter it, you must assign it another id). DICOM makes use of UIDs quite extensively in describing imaging related data. To prevent potential conflict of identifiers since images and image-related information is being increasingly distributed across institutions around the globe, a globally unique identifier is often assigned by a standards body to the implementing organization. Some of these issuing bodies include ANSI in the United States, BSI in Great Britain, DIN in Germany and COSIRA in Canada).
“You can teach a student a lesson for a day; but if you can teach him to learn by creating curiosity, he will continue the learning process as long as he lives. ” ~Clay P. Bedford
This issued identifier (often called the “org root”) is used as part of the overall identifier to ensure no two organizations or implementors can generate the DICOM information that would come in conflict with one another even when they are located across the globe. For example, in the SOP UID 1.2.840.10008.5.1.4.1.1.1.2 which is used to indicate Digital Mammography X-Ray Image Storage – for Presentation the “1.2.840.10008” is the org root that is reserved solely for use by the DICOM committee. The org root is then appended to a suffix which is generated by the implementing organization. The overall UID encoding scheme looks like this: {org root}.{suffix}. The suffix in turn can comprise of a set of identifiers that are generated using the rules of the organization. DICOM standard does not care how these are managed although best practices in the industry seem to follow the convention such as “{application id or MAC id}.{org object type id}.{unique key id}{date & time}”.
Examples of UIDs you are likely to run into all the time when dealing with DICOM include TransferSyntaxUID, SOPClassUID, SOPInstanceUID, StudyInstanceUID, SeriesInstanceUID, ReferencedSOPClassUID and ReferencedSOPInstanceUID. The SOPClassUID and SOPInstanceUID for instance are used to uniquely identify DICOM objects such as images, reports, etc. This is all you need to know about UIDs for now. We will come back to these later if/when required. The only other that I would mention here is that there is no strict policing of the UID generation process, and so, you may run into some implementors that generate UIDs without following the right protocol. By the way, if you are interested in generating UIDs in your custom application, you might want to check out the UIDGenerator class in the com.pixelmed.dicom package.
Sequence Items (or SQs)
In my previous tutorial that covered the structure of a DICOM file, I touched very briefly on a type of value representation called Sequence Types (often referred to as SQ). This type plays a very significant role in DICOM data encoding. Entire sequences of DICOM objects can be encoded using a single SQ VR (see Figure 1.0 below). Unlike other DICOM data elements, a SQ element has no data of its own. Instead, it simply contains a sequence of other DICOM objects within. Moreover, these child elements themselves may be SQ types and may also contain child elements. As a result, you may sometimes see multiple nesting levels when dealing with DICOM data (sometimes up to 6 levels deep).
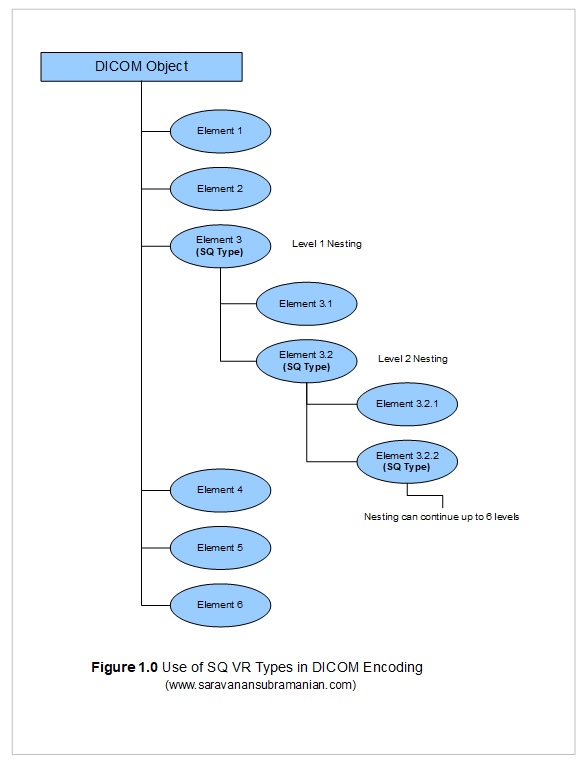
If you run the examples in my previous tutorial, you will see a DICOM SQ element called RequestAttributesSequence (0040,0275) which in turn contains the ScheduledProcedureStepDescription (0040,0007), the ScheduledProcedureStepID (0040,0009) and the RequestedProcedureID (0x0040,0x1001) elements within it. This is all what most developers using a toolkit such as the PixelMed library need to know in general regarding SQ types. However, if you are planning to write a DICOM parser from scratch, you will have to understand implicit and explicit length encoding to figure out where these sequence elements start and end just like when you deal with XML tags for instance.
Four Level Hierarchy
In my previous two tutorials, I mentioned the standard hierarchy that DICOM uses when encoding information which is that a patient may have one or more studies, each study in turn consisting of one or more series, and each series in turn consisting of one or more DICOM images. People that are new to the DICOM world are often surprised to find that most DICOM implementations by default only permit queries in a hierarchal manner (you need to know the patient to find the study, the study to find the series, and the series to find the image). This is somewhat different from dealing with systems built on the relational approach where you can retrieve information as long as you know some information regarding the entity. Although most modern DICOM systems implement both approaches, understanding the significance of the patient id, the study instance id, the series instance id and SOP instance id data elements is very important for DICOM related processing as all these attributes are often required to “zoom in” on the data that is of interest to you.
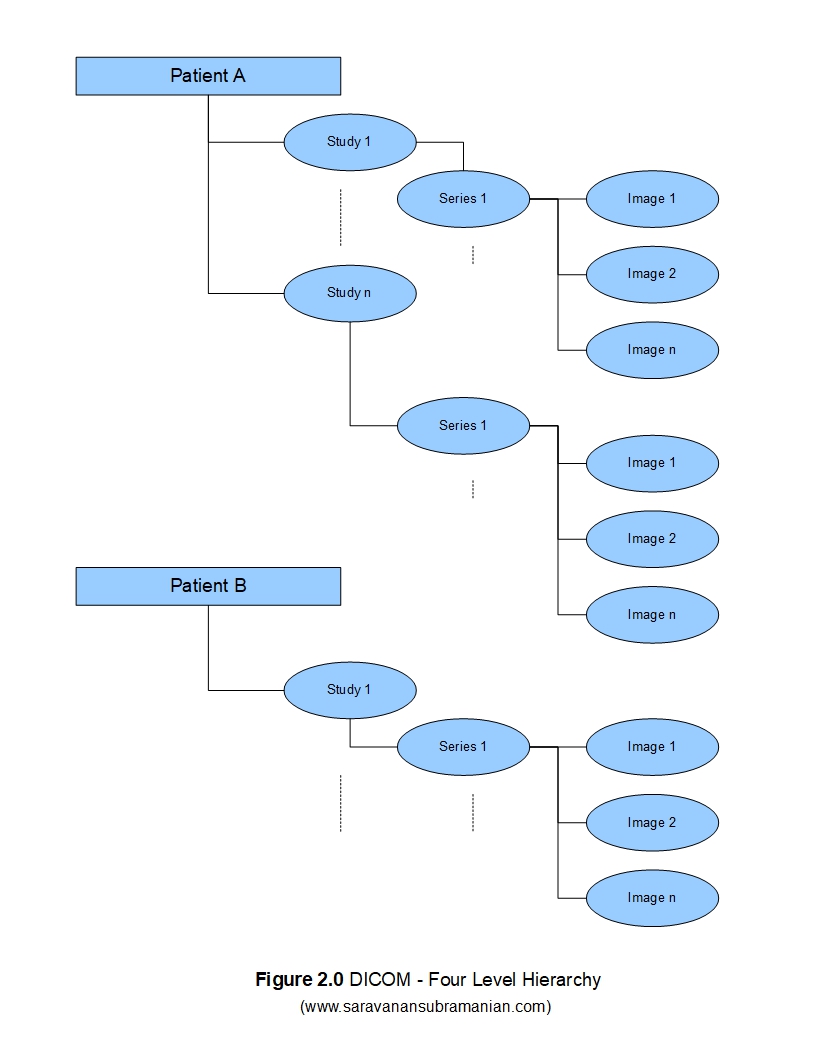
So, ensuring that all these attributes are coded correctly when you are implementing a DICOM application is extremely important so that users can retrieve and process any DICOM data that is generated by your application. In most implementations, the patient id is generated by the hospital information system (HIS), and the study, series and image ids are auto-generated by the modality unit that creates the images.
Now that we understand a few more things about DICOM, we are in a good position to proceed to the next step of creating a Secondary Capture Image (SC) DICOM file.
The PixelMed Java DICOM Toolkit - Quick Overview
For the purposes of illustrating many aspects of DICOM that I plan to cover in this tutorial series, I will be using a freely available and powerful DICOM toolkit called PixelMed Java DICOM Toolkit. This is a completely stand-alone DICOM toolkit that provides functionality for DICOM file and directory processing, image viewing as well as DICOM networking-related operations. This toolkit is completely free for both commercial or non-profit use. It is well documented and also has a small discussion forum and mailing list for users. The list of features contained within this toolkit is quite comprehensive. Please keep in mind that the use of this toolkit in my tutorial does not in anyway imply my official endorsement of it for implementing a production application. Every situation is unique, and only you are ultimately in the best position to decide that. This article is also not meant to be a tutorial on this toolkit, and my focus here is simply to tie DICOM theory to what a practical (although simple) implementation might look like. So, if your goal is to learn how to use the PixelMed library, I would encourage you to visit its website or check out the discussion forum or StackOverflow discussion pages for any assistance.
Before We Get Started…
Much like my previous programming examples, I will use the most bare minimum code and approach to help illustrate the concepts that I cover in this tutorial. This means that the code I write here is best suited to simply show the concept that I am trying to explain and is not necessarily the most efficient code to deploy in real life and in your production application.
To get started, you will need to configure a few things on your machine including a Java development environment as well as the PixelMed toolkit before you can run the example if you want to try this out yourself.
- Download and install the Eclipse Java IDE from here (or use any other IDE you prefer)
- Download the PixelMed toolkit library from here
- Ensure that the PixelMed.jar library is included in your Java project’s class path (some examples may require additional runtime dependencies such as JAI Image IO Tools that can be found on PixelMed software download. Look for a tar compressed file called pixelmedjavadicom_dependencyrelease.YYYYMMDD.tar.bz2 or something similar)
- You can find the source code and images used in this tutorial on GitHub
- You can download more DICOM images from this site if you want as well
Creating a DICOM file from a Non-DICOM Image
To create a new DICOM file from an existing image such as a JPEG, BMP or TIFF file, we need to utilize the ImageToDicom class in the PixelMed toolkit. The ImageToDicom class has multiple constructors. The version that I will use below takes in the input image to use for pixel data, the path to the new DICOM file to be created, the patient name, the patient id, the study id and the series number. See code illustration below showing the code and the console listing of the numerous attributes of the new DICOM file that was created. Pay special attention both to the UID attributes such as InstanceCreatorUID, SOPClassUID, SOPInstanceUID, StudyInstanceUID and SeriesInstanceUID which were auto-generated by the PixelMed toolkit as well as how the values of the attributes we specified for patient id, patient name, study id and series number are encoded. For those wondering what the difference is between study id and study instance uid, the study id is sometimes keyed in by the technologist working with the modality, whereas the study instance UID is a globally unique identifier automatically generated by the modality using the principles that I described in the section discussing UIDs above.
    package com.saravanansubramanian.dicom.pixelmedtutorial;

    import com.pixelmed.dicom.AttributeList;
    import com.pixelmed.dicom.ImageToDicom;

    public class CreateADicomFile {

        public static void main(String[] args) {
            String scJpegFilePath = "D:\\JavaProjects\\Sample Images\\ChestGeneralImage.jpg";
            String newDicomFile = "D:\\JavaProjects\\Sample Images\\Saravanan.dcm"; //see article footnote below
            try {
                //generate the DICOM file from the jpeg file and the other attributes supplied
                //note: The PixelMed toolkit encodes some attributes for you automatically as well
                //you may have to explicitly control in your situation
                //the API construct is a bit different in PixelMed for those you are used to invoking a 'command' method
                new ImageToDicom(scJpegFilePath, //path to existing JPEG image
                                newDicomFile, //output DICOM file with full path
                                "Saravanan Subramanian", //name of patient
                                "12121221", //patient id
                                "2323232322", //study id
                                "3232323232", //series number
                                "42423232234"); //instance number
                //now, dump the contents of the DICOM file to the console
                AttributeList list = new AttributeList();
                list.read(newDicomFile);
                System.out.println(list.toString());

            } catch (Exception e) {
                e.printStackTrace(); //in real life, do something about this exception
            }
        }

    }
A small portion of the output from running the code above is shown below:
(0x0002,0x0000) FileMetaInformationGroupLength VR=<UL> VL=<0x4> [0xdc]
(0x0002,0x0001) FileMetaInformationVersion VR=<OB> VL=<0x2> []
(0x0002,0x0002) MediaStorageSOPClassUID VR=<UI> VL=<0x1a> <1.2.840.10008.5.1.4.1.1.7 >
(0x0002,0x0003) MediaStorageSOPInstanceUID VR=<UI> VL=<0x40> <1.3.6.1.4.1.5962.99.1.3946.1299.1524365085765.1.1.2322.3232.2234>
(0x0002,0x0010) TransferSyntaxUID VR=<UI> VL=<0x14> <1.2.840.10008.1.2.1 >
(0x0002,0x0012) ImplementationClassUID VR=<UI> VL=<0x16> <1.3.6.1.4.1.5962.99.2 >
(0x0002,0x0013) ImplementationVersionName VR=<SH> VL=<0x10> <PIXELMEDJAVA001 >
(0x0002,0x0016) SourceApplicationEntityTitle VR=<AE> VL=<0xa> <OURAETITLE>
(0x0008,0x0008) ImageType VR=<CS> VL=<0x12> <DERIVED\SECONDARY >
(0x0008,0x0014) InstanceCreatorUID VR=<UI> VL=<0x16> <1.3.6.1.4.1.5962.99.3 >
(0x0008,0x0016) SOPClassUID VR=<UI> VL=<0x1a> <1.2.840.10008.5.1.4.1.1.7 >
(0x0008,0x0018) SOPInstanceUID VR=<UI> VL=<0x40> <1.3.6.1.4.1.5962.99.1.3946.1299.1524365085765.1.1.2322.3232.2234>
(0x0008,0x0020) StudyDate VR=<DA> VL=<0x8> <20180421>
(0x0008,0x0030) StudyTime VR=<TM> VL=<0xa> <204445.767>
(0x0008,0x0050) AccessionNumber VR=<SH> VL=<0x0> <>
(0x0008,0x0060) Modality VR=<CS> VL=<0x2> <OT>
(0x0008,0x0064) ConversionType VR=<CS> VL=<0x4> <WSD >
(0x0008,0x0070) Manufacturer VR=<LO> VL=<0x0> <>
(0x0008,0x0090) ReferringPhysicianName VR=<PN> VL=<0x4> <^^^^>
(0x0010,0x0010) PatientName VR=<PN> VL=<0x16> <Saravanan Subramanian >
(0x0010,0x0020) PatientID VR=<LO> VL=<0x8> <12121221>
(0x0010,0x0030) PatientBirthDate VR=<DA> VL=<0x0> <>
(0x0010,0x0040) PatientSex VR=<CS> VL=<0x0> <>
(0x0020,0x000d) StudyInstanceUID VR=<UI> VL=<0x36> <1.3.6.1.4.1.5962.99.1.3946.1299.1524365085765.1.2.2322>
(0x0020,0x000e) SeriesInstanceUID VR=<UI> VL=<0x3c> <1.3.6.1.4.1.5962.99.1.3946.1299.1524365085765.1.3.2322.3232 >
(0x0020,0x0010) StudyID VR=<SH> VL=<0xa> <2323232322>
(0x0020,0x0011) SeriesNumber VR=<IS> VL=<0xa> <3232323232>
(0x0020,0x0013) InstanceNumber VR=<IS> VL=<0xc> <42423232234 >
(0x0020,0x0020) PatientOrientation VR=<CS> VL=<0x0> <>
(0x0020,0x0060) Laterality VR=<CS> VL=<0x0> <>
(0x0028,0x0002) SamplesPerPixel VR=<US> VL=<0x2> [0x3]
(0x0028,0x0004) PhotometricInterpretation VR=<CS> VL=<0x4> <RGB >
(0x0028,0x0006) PlanarConfiguration VR=<US> VL=<0x2> [0x0]
(0x0028,0x0010) Rows VR=<US> VL=<0x2> [0x1ae]
(0x0028,0x0011) Columns VR=<US> VL=<0x2> [0x1ae]
(0x0028,0x0100) BitsAllocated VR=<US> VL=<0x2> [0x8]
(0x0028,0x0101) BitsStored VR=<US> VL=<0x2> [0x8]
(0x0028,0x0102) HighBit VR=<US> VL=<0x2> [0x7]
(0x0028,0x0103) PixelRepresentation VR=<US> VL=<0x2> [0x0]
(0x0028,0x0301) BurnedInAnnotation VR=<CS> VL=<0x4> <YES >
(0x7fe0,0x0010) PixelData VR=<OB> VL=<0x876cc>
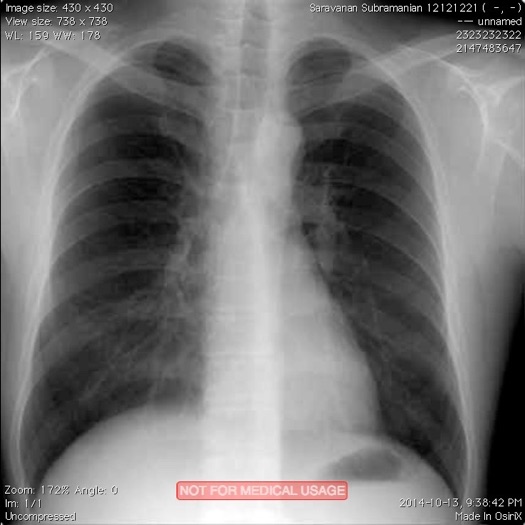
Running the code example above creates a new DICOM file and also lists the attributes of the file to the console. Please note that even though we only supplied 5 attributes during creation of the DICOM file, a lot of other attributes have values that are either generated automatically, or left blank, or with default values. For now, we have created a perfectly valid DICOM image that is encoded correctly for all intents and purposes. Later, we will see how you can add additional attributes to a DICOM object. Screen capture below shows what the new DICOM image looks like when viewing it in OsiriX software running on my Mac workstation.
Conclusion
I hope this tutorial was helpful to understanding how DICOM encoding works in general. As this is a beginner tutorial, there was only so much I could cover here. If you want to understand more about DICOM encoding and decoding, I recommend that you to check out the part 5 document of the official DICOM standard available here. I also plan to come back to things covered in the tutorial when I show you how to encode multi-frame DICOM images to create cine loops in a future tutorial. However, in my next DICOM tutorial, I will show you how to extract image data from an existing DICOM file. If you have any questions or comments regarding this tutorial, please feel free to send me an email. Please note that I may not get back to you right away due to work and other commitments.
Footnote: The DICOM standard restricts the file names/identifiers contained within to 8 characters (either uppercase alphabetic characters and numbers only) to keep in conformity with legacy/historical requirements. It also states that no information must be inferred/extracted from these names. The file names usually don’t have a .dcm extension when they are stored as part of a media such as CD or DVD. I use longer names to keep these details from being a distraction right now, but I still want to mention what the standard states here so that no confusion arises as a result.